Henry turned 6 on October 11, and we celebrated his birthday with a Mario-themed party at home. We’re big on themes in our house, and this was a fun one to do.
If you follow this blog, you know that there are a bunch of kid-focused venues that we love in the area. When it comes to parties though, I prefer to have them at home for now. I always love looking through ideas on Pinterest when I first start planning, so I wanted to document our party!
*When you see an asterisk, it means that I am including an Amazon link. As an Amazon Associate I earn a small amount from qualifying purchases. I am always honest though and tell you if I have found a better price elsewhere.
INVITATIONS/THANK YOUS
Typically, I make my own invitations and have them printed via 1-hour photo at CVS. This year, I kept invitations super simple and just texted a cute graphic to our friends/family. Henry was Mario for Halloween, so he had fun putting on his costume and posing for some pics. I used photoshop to create the invitation.

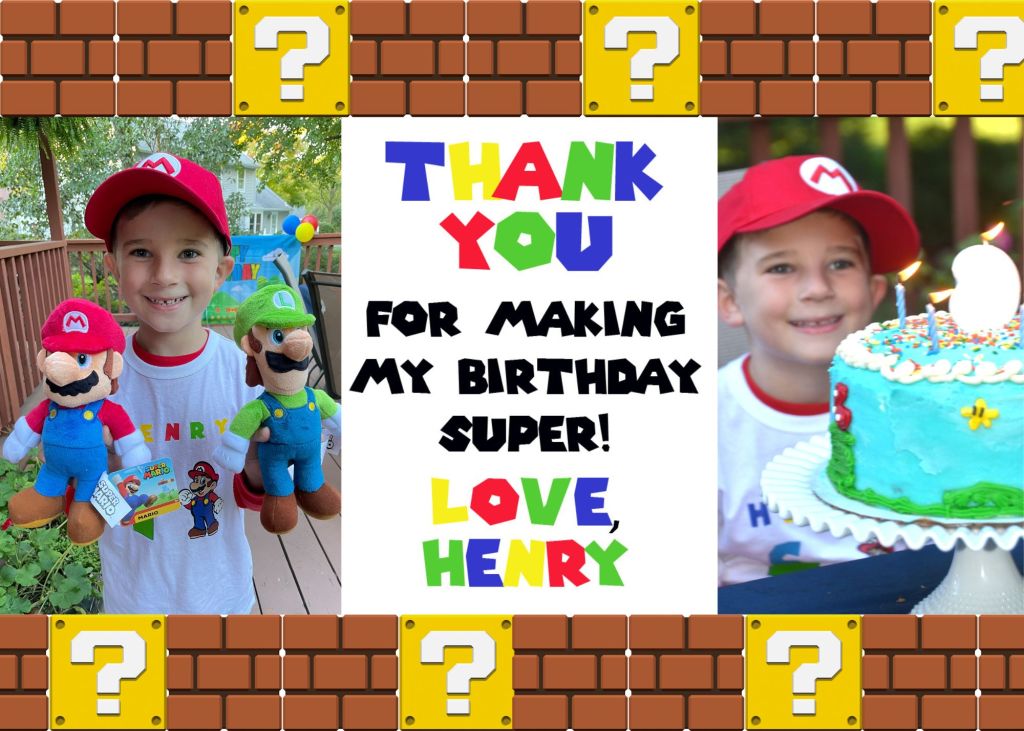
For the Thank You cards, I did the Design Your Own option on the CVS website. I used a combination of Photoshop and Canva to design the Thank Yous using photos from the party and free Mario clipart I found online. Then I uploaded to the CVS site and had them in my hand a few hours later.
Tip: I used a free Mario font that I found online for the Invitations, Thank You cards and for signs I made for the party. I do this often when it’s a party theme with a recognizable font as it’s a simple/cheap way to tie the theme together.
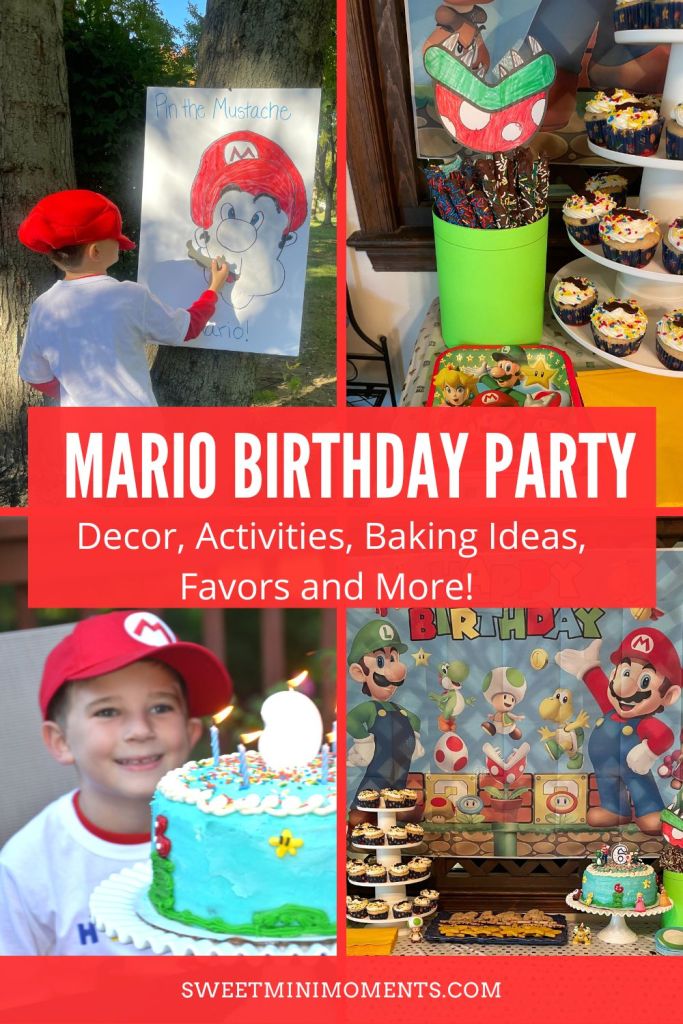
DECOR
With an October birthday, we were able to spread the party out between having food mostly set up inside but the games for the kids outside. For decorating purposes, I focused on 3 main areas – the dessert table and fireplace mantle inside and our deck outside. I also put up some streamers in the dining room.
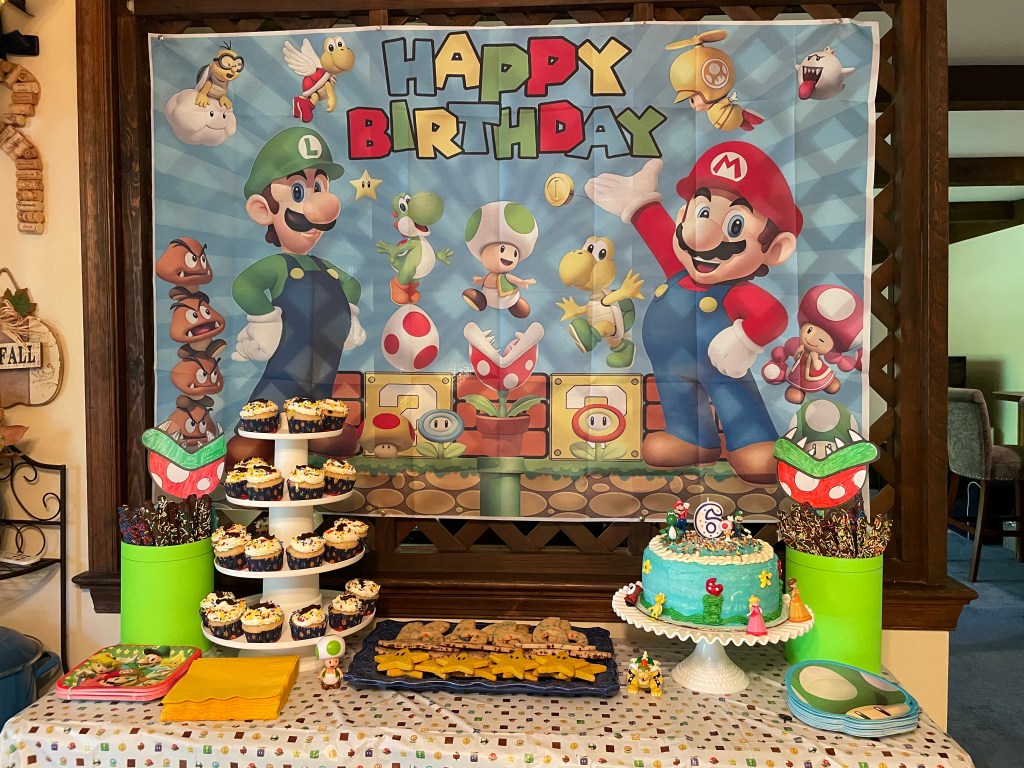
I found two big banners on Amazon that worked great as decor and photo backdrops. I hung one from our deck railing and tried to snap a pic with each friend before they left the party. I hung the other banner behind the dessert table in the kitchen. These are really high quality, so I didn’t have to worry about them tearing during the party.
Balloons were another easy way to add a themed festive touch. To save money, I bought balloons from both Dollar Tree and Party City. (Conveniently, they’re located next door to each other where I go!) I bought the Mario balloons at Party City the day before the party and tied a few to our lamp post out front to greet people, and then a few inside and in the back yard. To save money, I paired them with red, blue and gold star helium balloons from Dollar Tree, and then I blew up some blue, yellow and red balloons using our little air pump. (Well worth the money. It gets used all the time.)
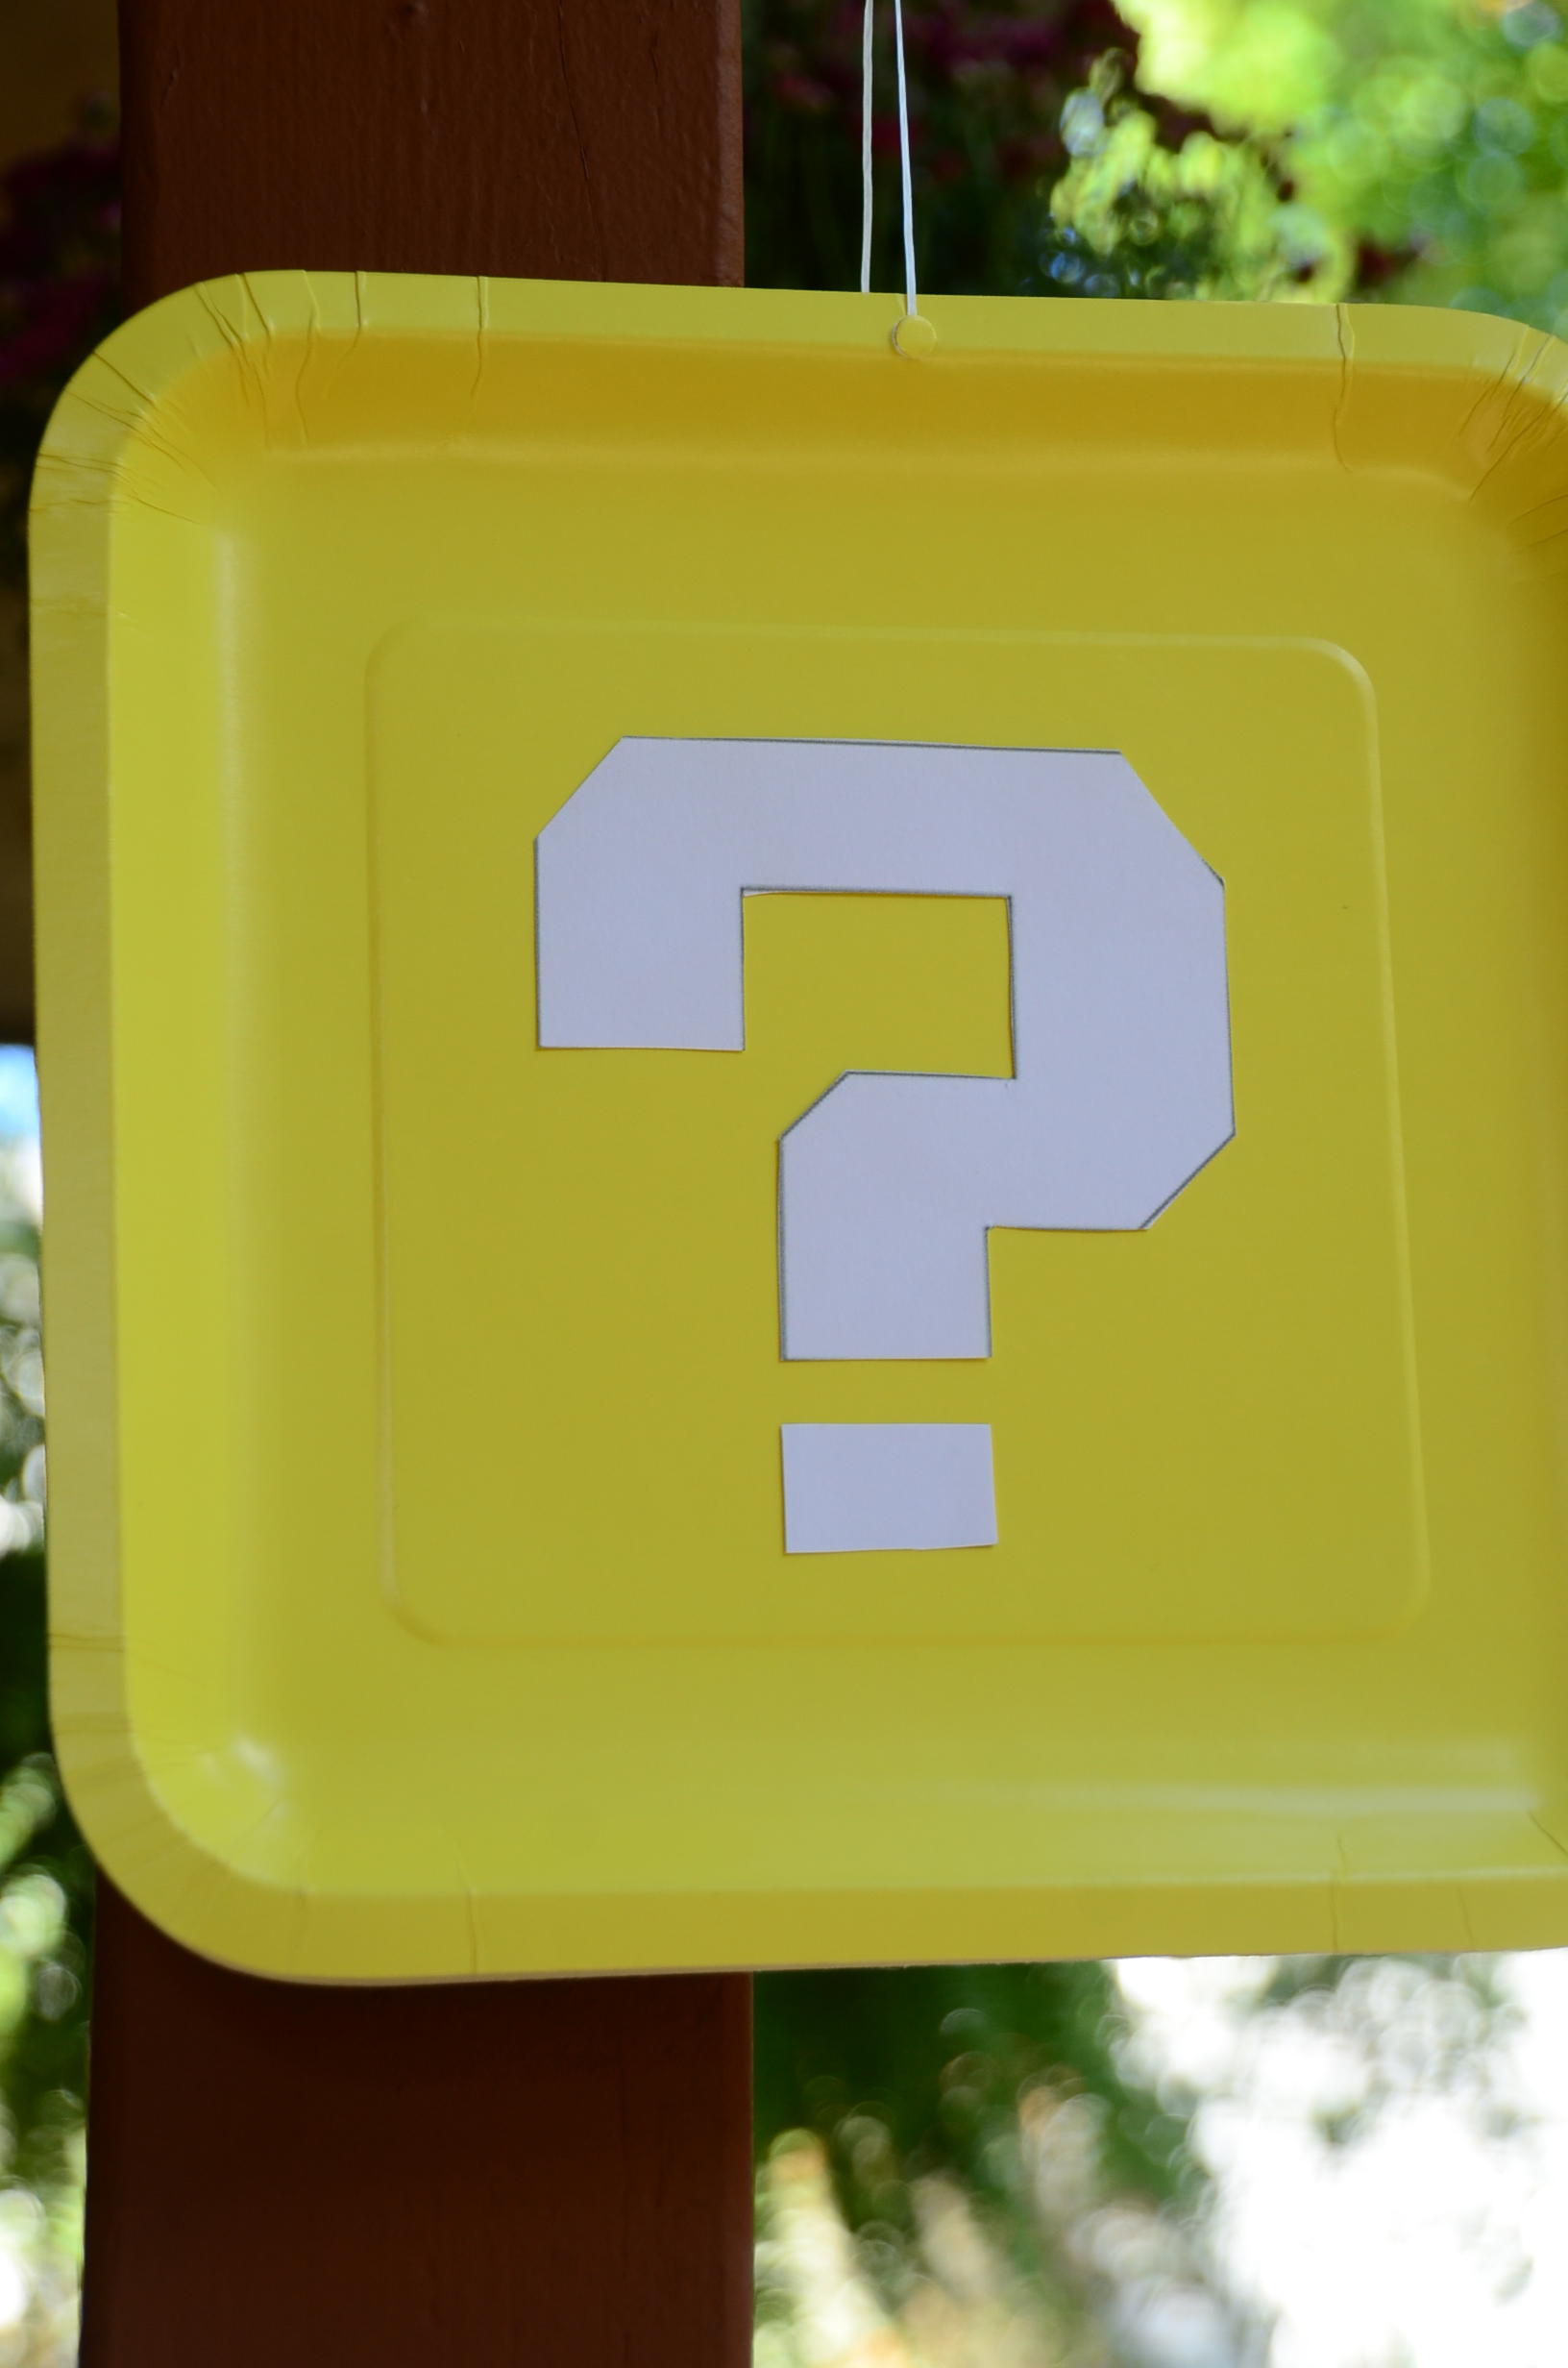
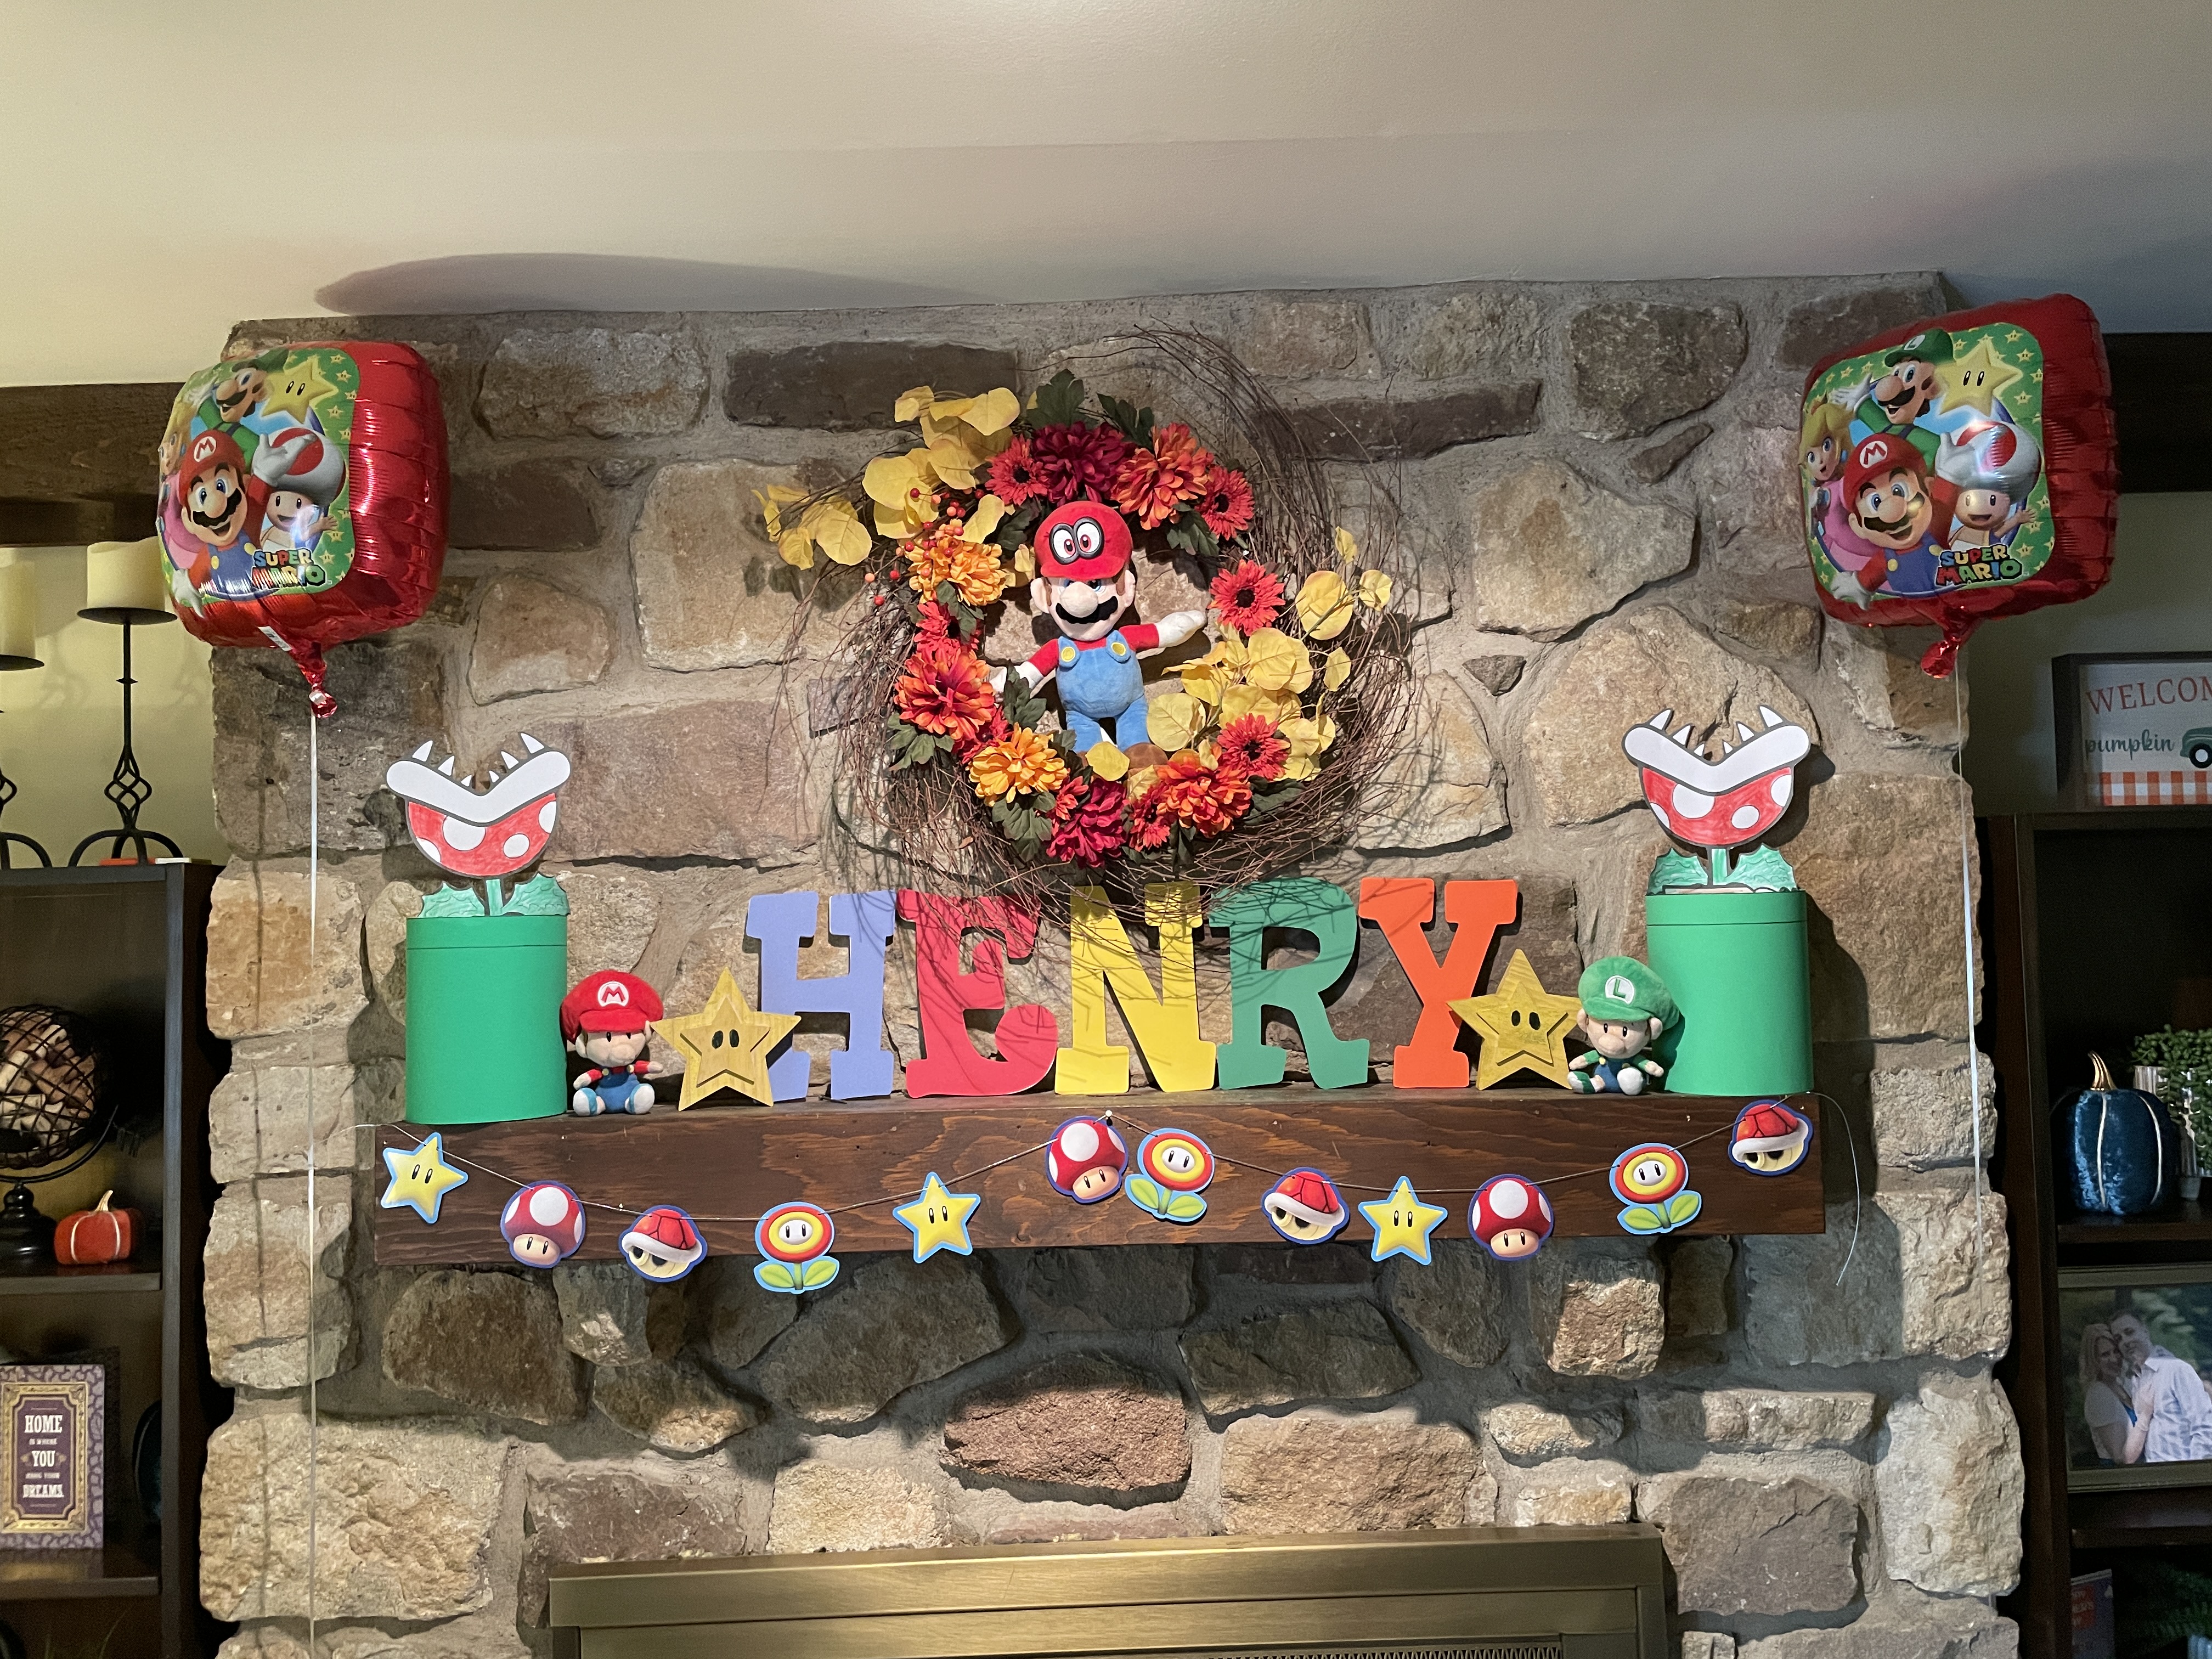
DIY Decor: I also made some decorations! I bought yellow square paper plates from Oriental Trading. I taped them together to make them double sided and glued on white question marks that I cut out of paper. I punched a hole in top that I put white floss through and then hung them from the beams in my family room and from our covered deck and a few trees to make mystery blocks.
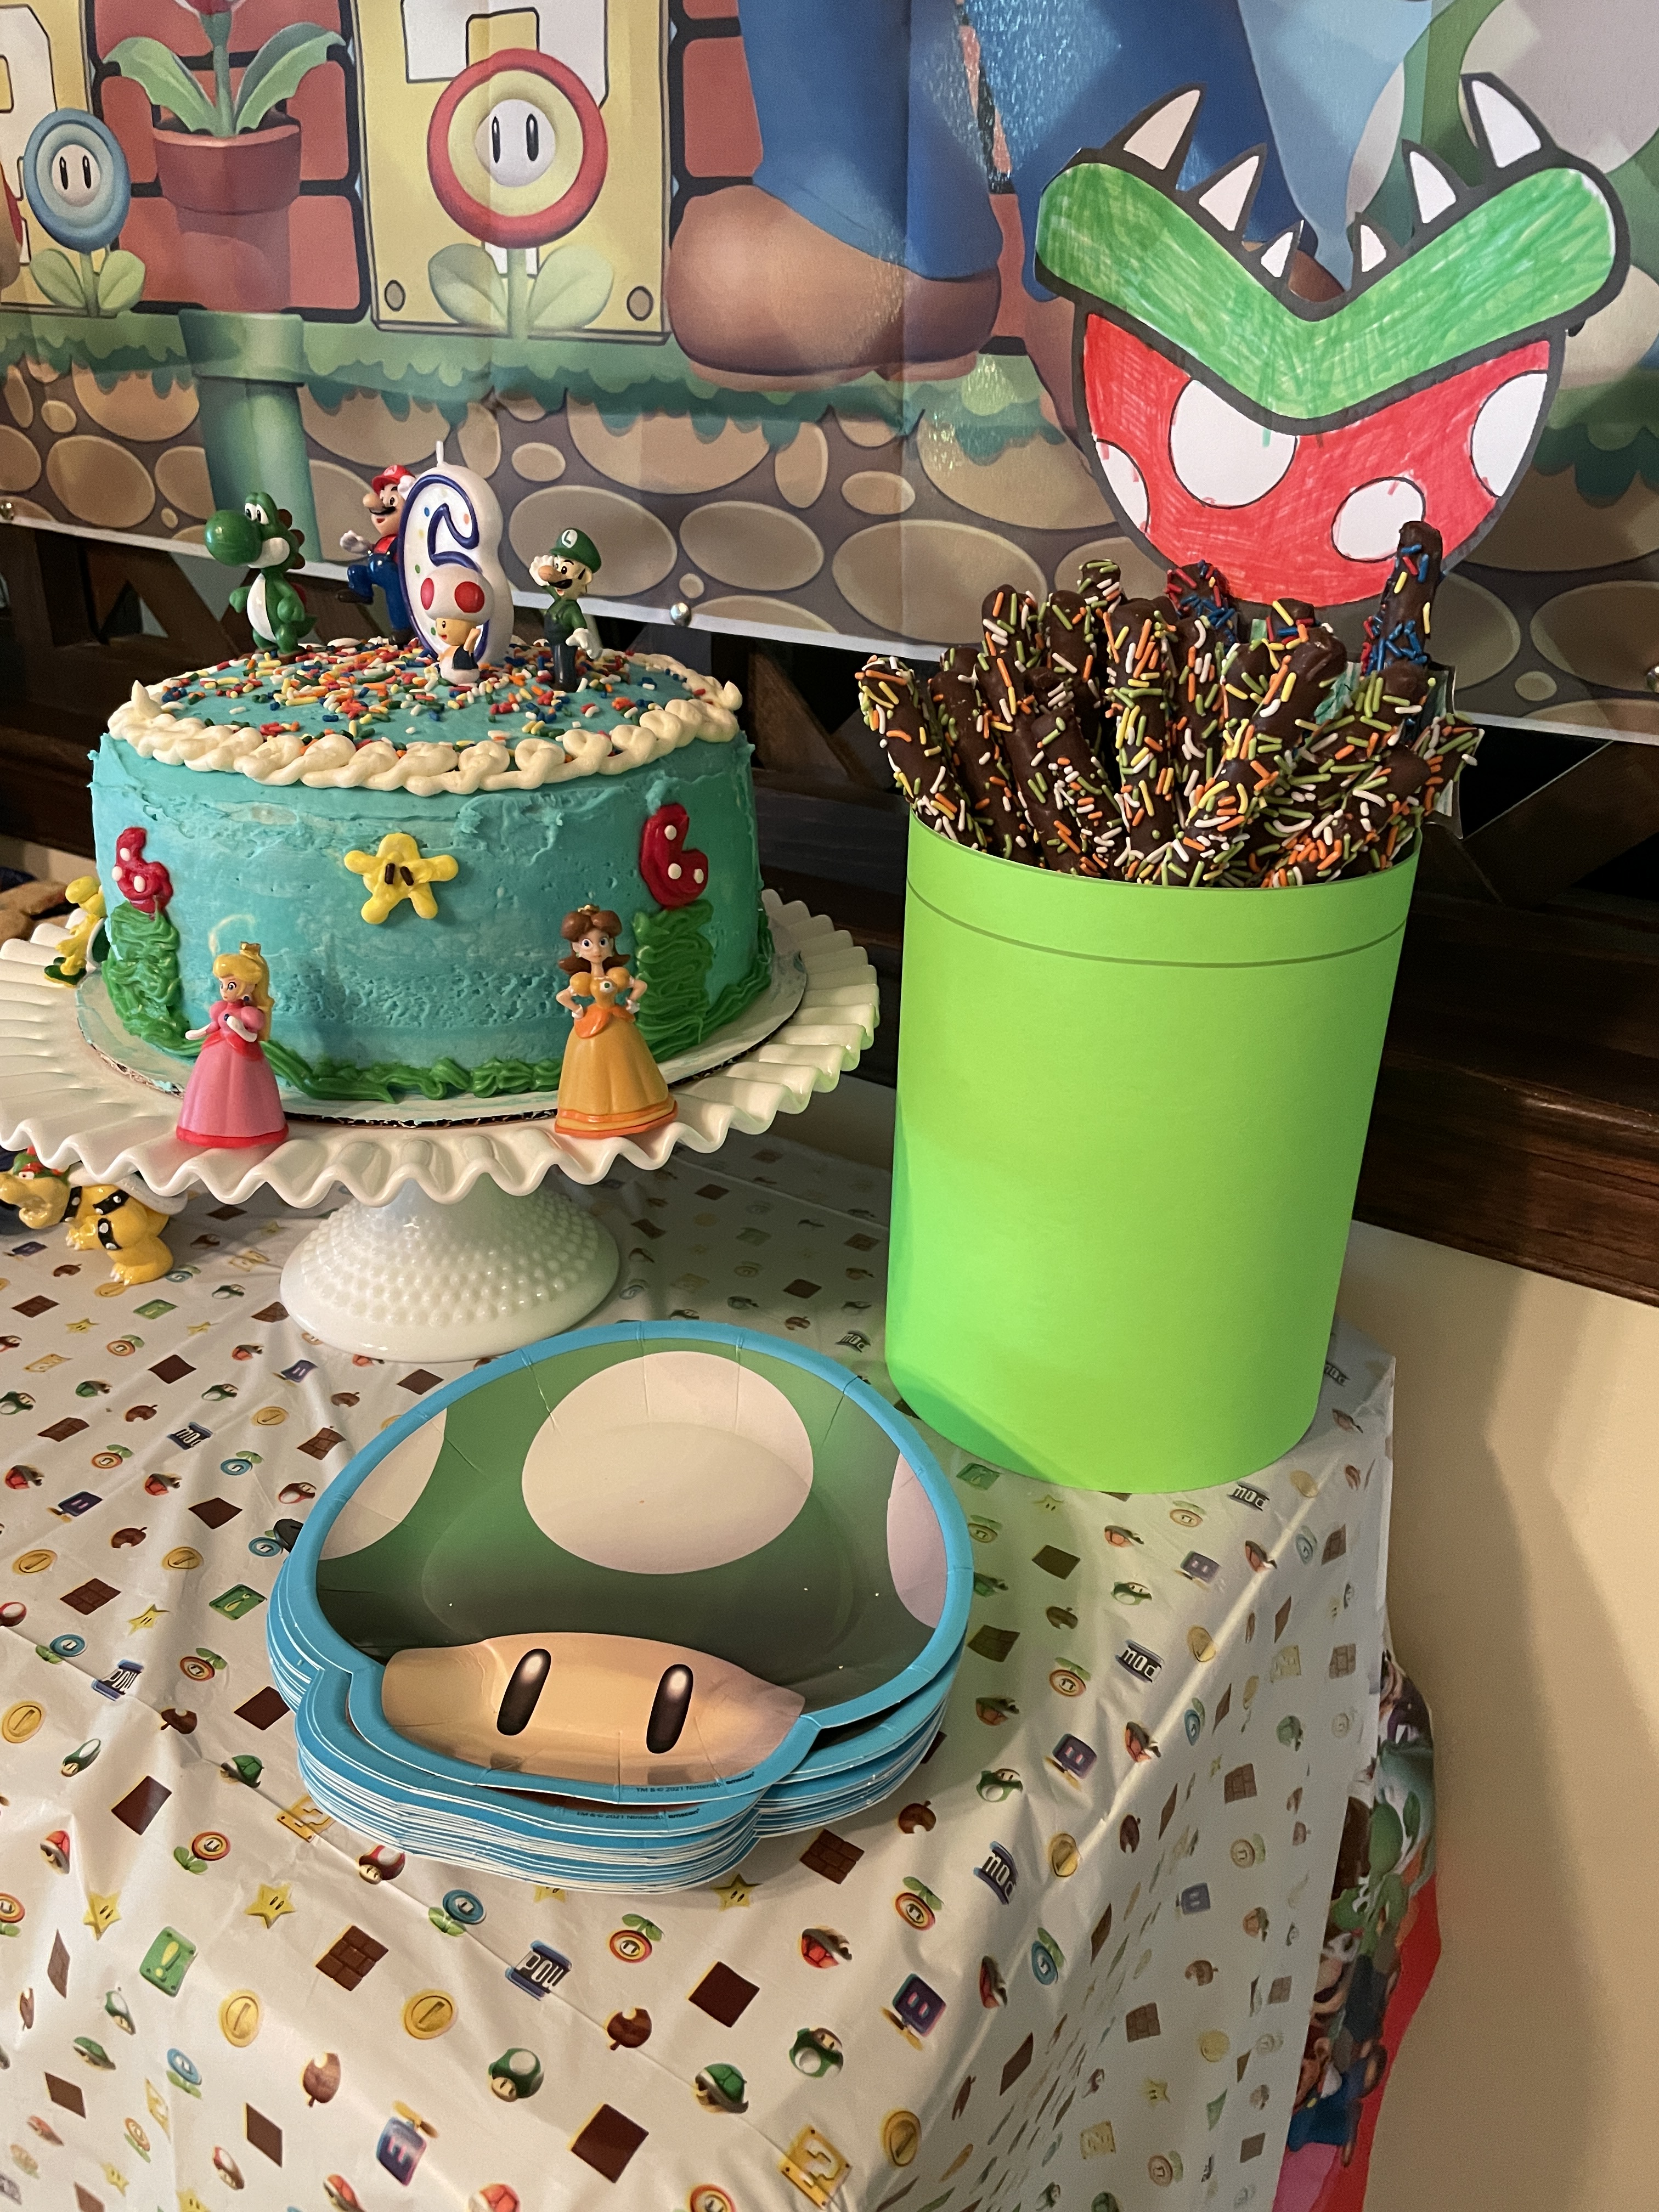
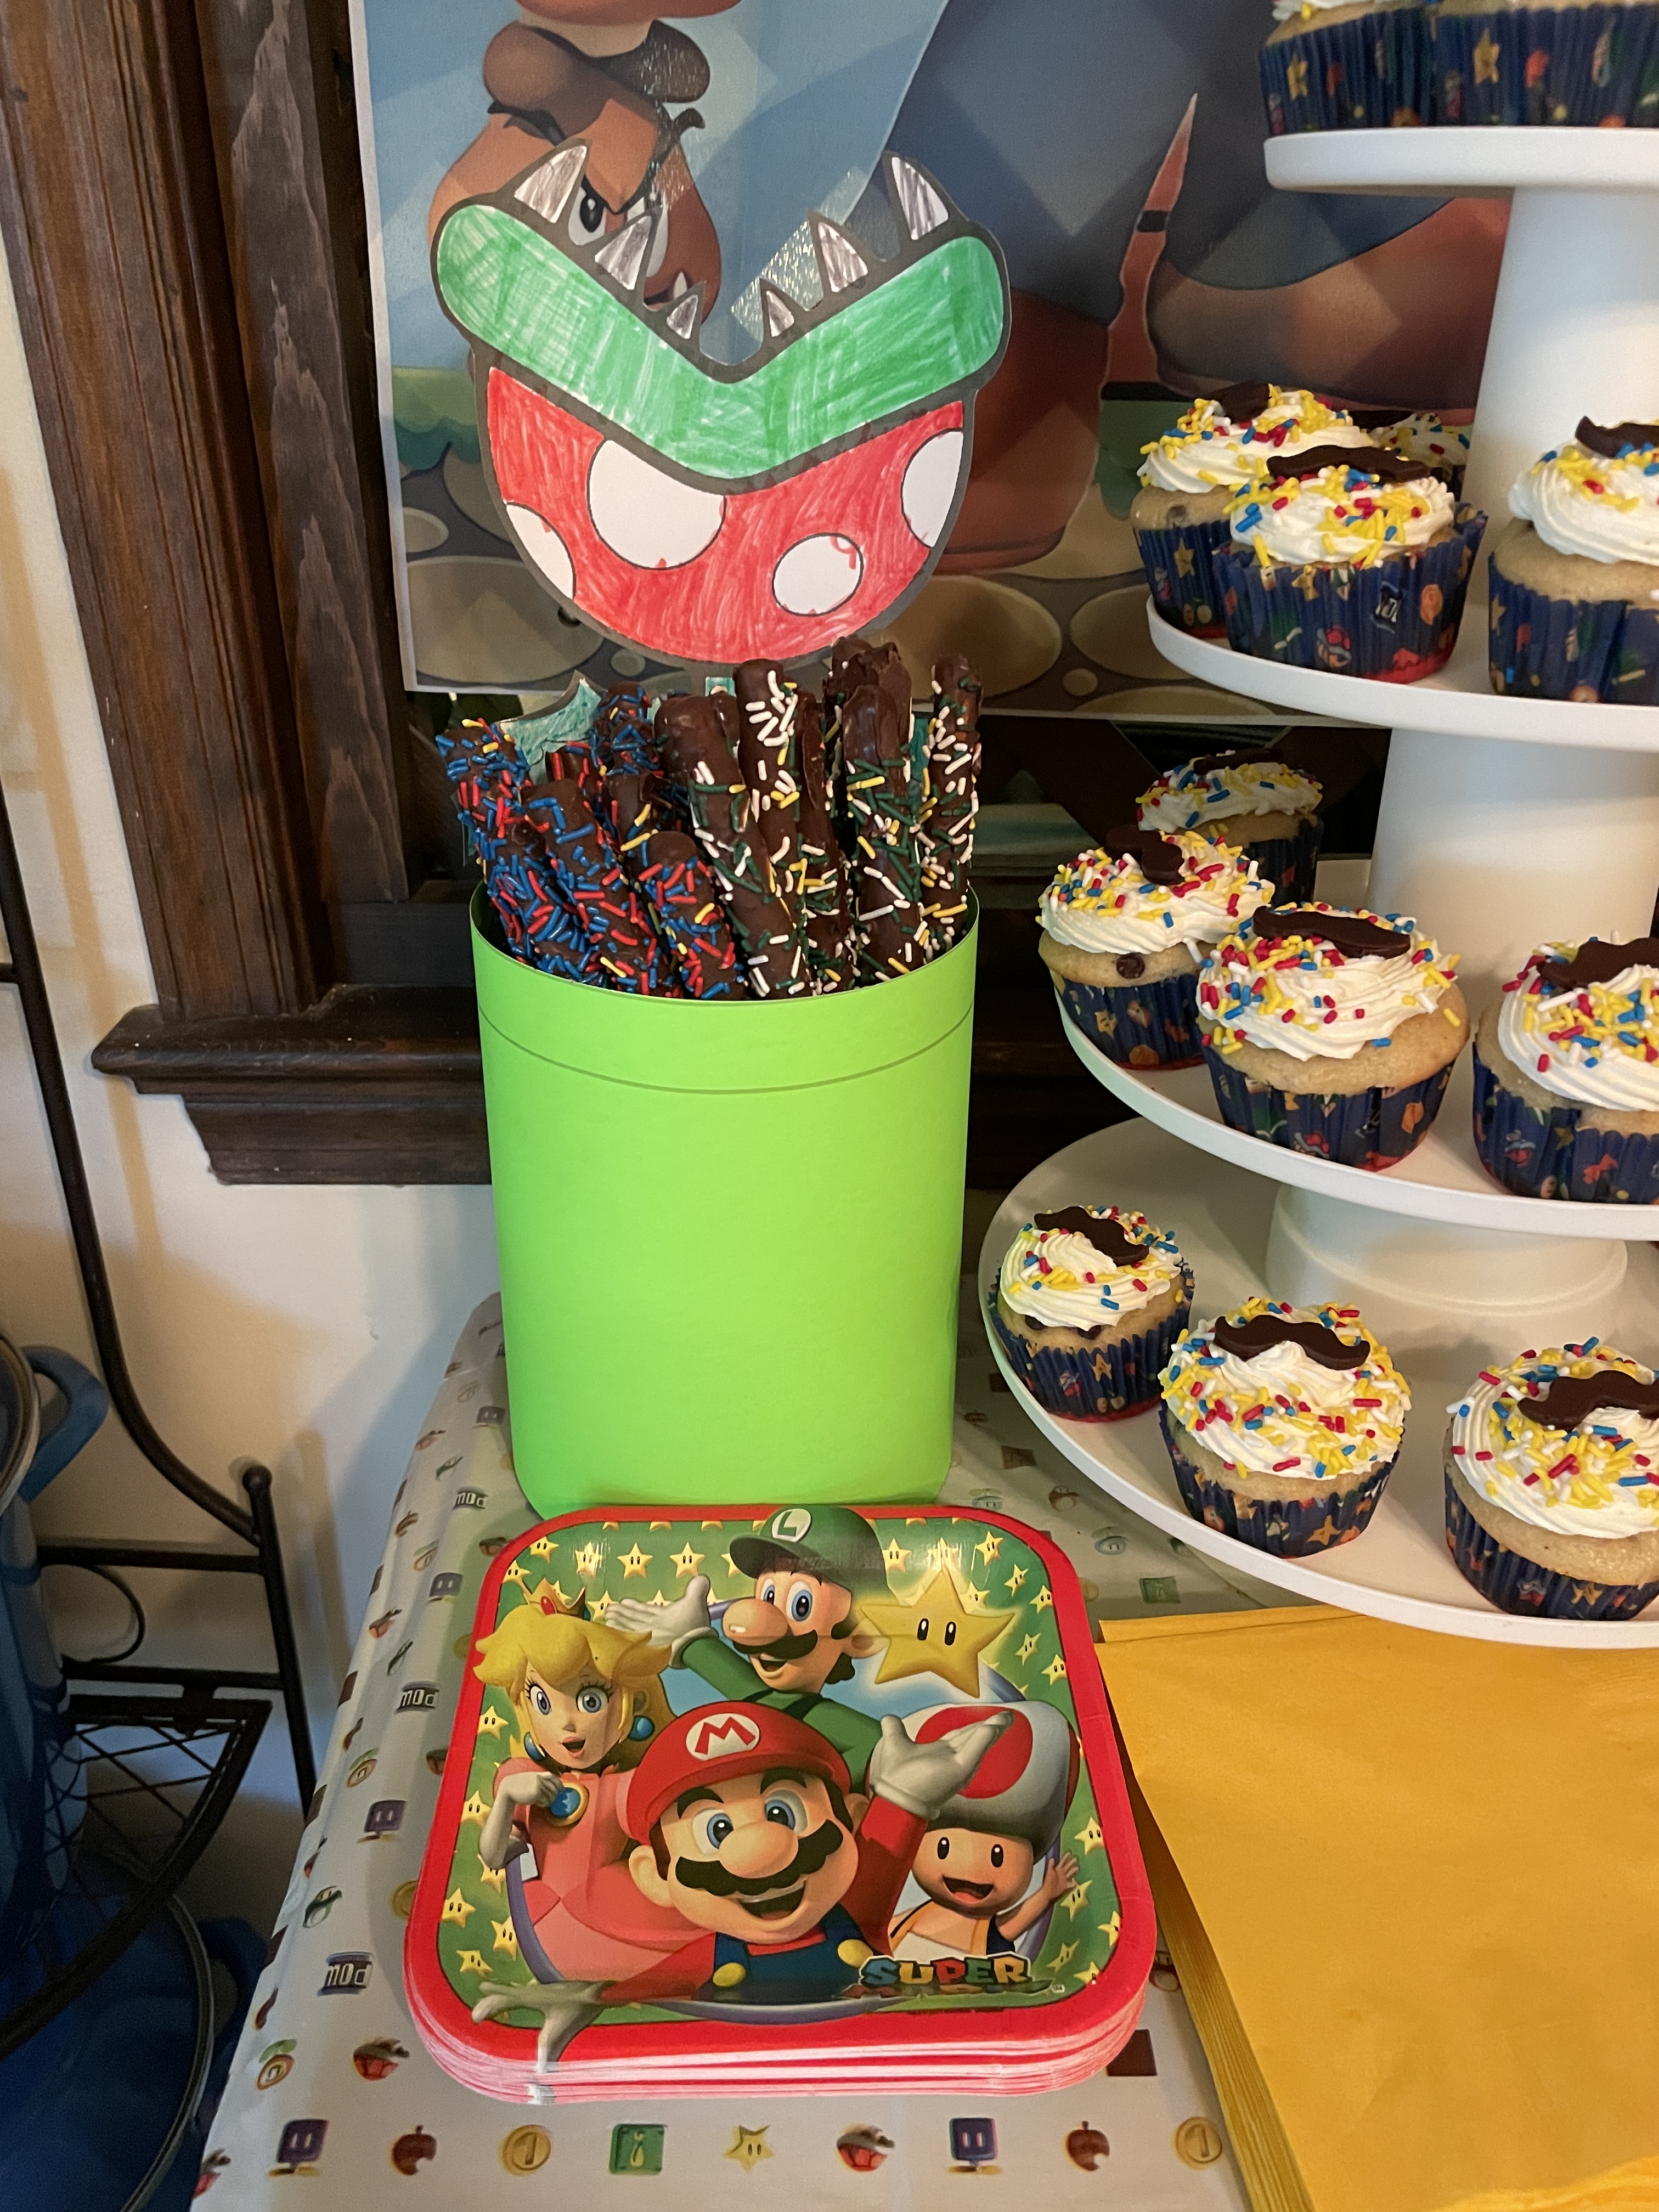
Another cheap but high impact decoration I made was green pipes with piranha plants. These were used in games, to display chocolate covered pretzels and just as decoration. I made them out of green poster board I bought at Dollar Tree and empty pretzel barrels I’d been saving.
And of course, just adding some stuffed animals/plush toys you already own helps with the theme!
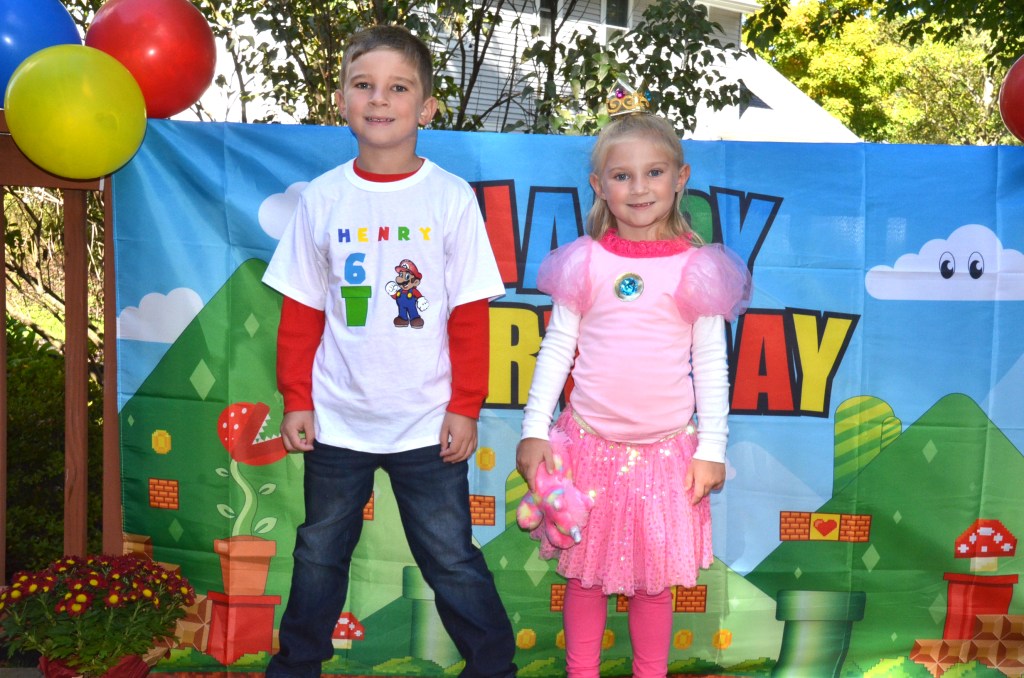
I typically buy each of my kids a new shirt to go along with their birthday theme. I’ve been incredibly lucky that my sister has made several of their more recent shirts, but Etsy and Amazon are always great places to check, too. My sister made Henry’s shirt this year using files we bought from Etsy and a white t-shirt from Children’s Place. HERE is a link to a similar shirt I found on Amazon*. Charlotte was Princess Peach for Halloween, and her costume was 2-piece, making it easy to pair the top with a shorter tutu and leggings to be a little more appropriate for running around in the yard.
ACTIVITIES
I typically keep the activities pretty simple at our parties because the kids range from toddler to teen. I set up a few different stations with things they can do at their own pace, and then have a few activities where I try to get everyone to play together. Mario was a really fun theme, so we had more activities than we’ve probably ever had in the past. Remember to “shop” your own house! I’ve made so many games over the years just using toys we already have and adding a few things to make them feel on theme.
Pumpkins
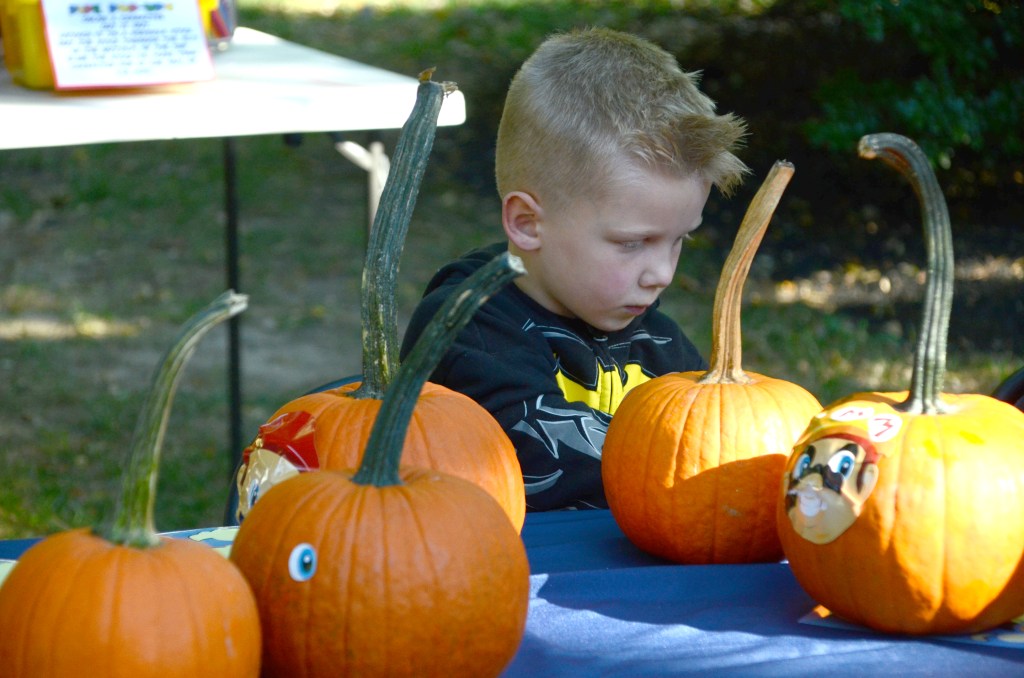
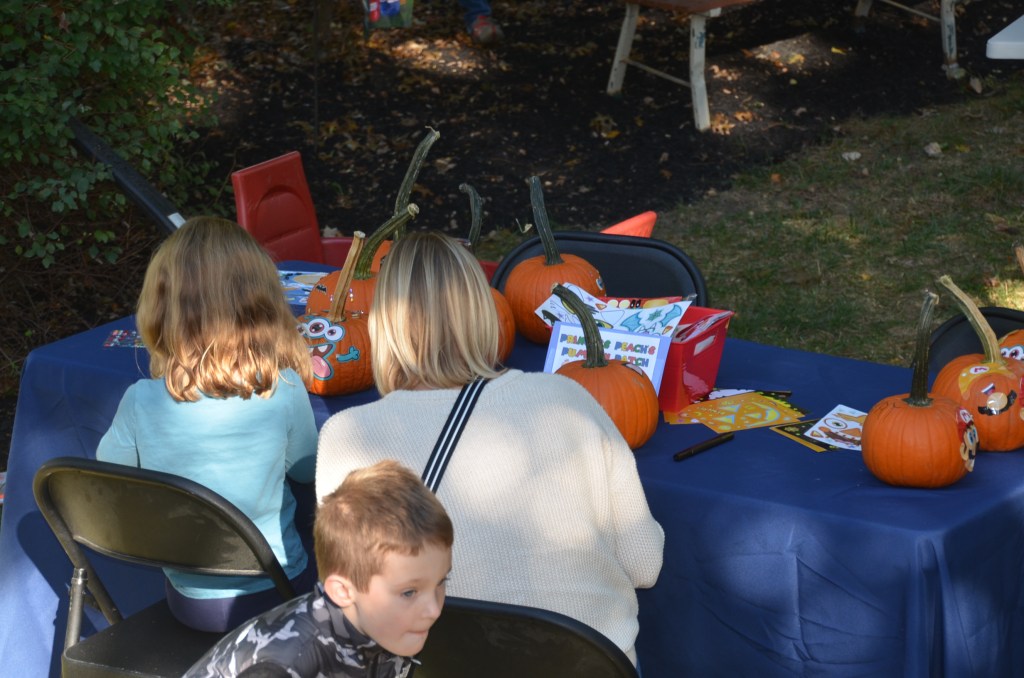
Henry has an October birthday, and it’s become a tradition since his first birthday that I go pick up a bunch of small pumpkins for the kids to decorate and take home. If you live in Lower Bucks County, Fairless Hills Garden Center and Styer Orchard are my two favorite spots for getting the pumpkins because they usually have the best prices. Instead of trying to do carving or painting which can get really messy with so many kids, I usually get sticker packs and some extras from Dollar Tree. This year, I got a Mario sticker pack* where kids could make their pumpkins look like different characters. THIS* sticker set from Amazon is my go-to for more generic pumpkins. We always end up with leftover decorating supplies, but since this is a tradition, I just add to my stock for the following year!
Piranha Plant Ball Toss
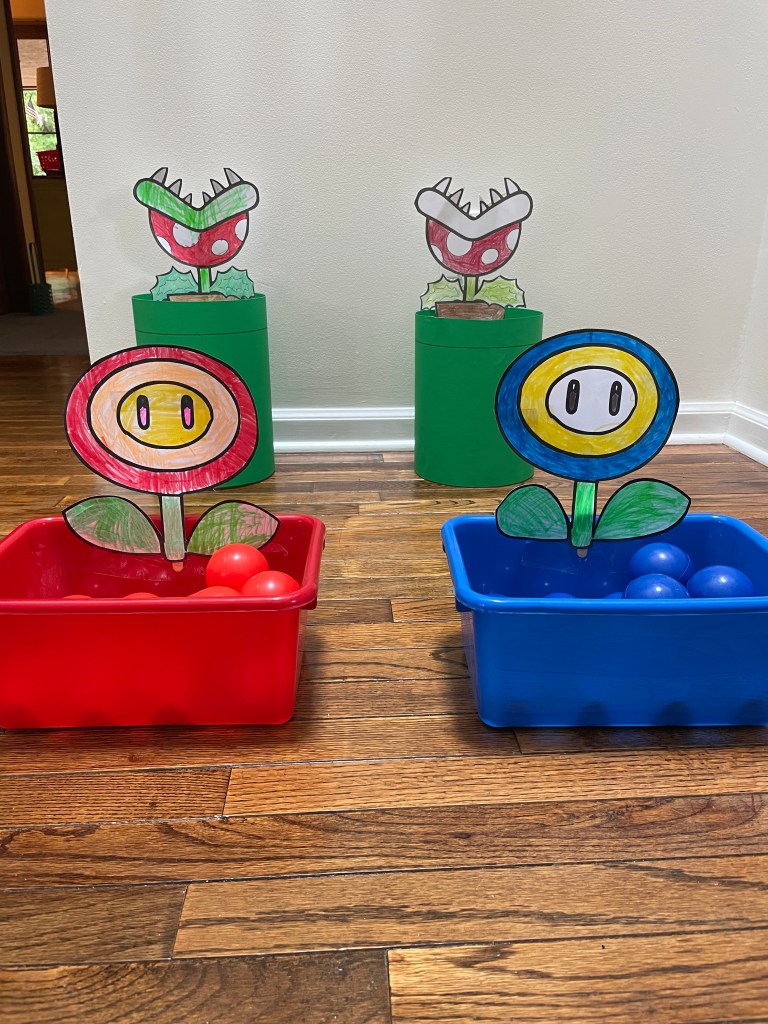
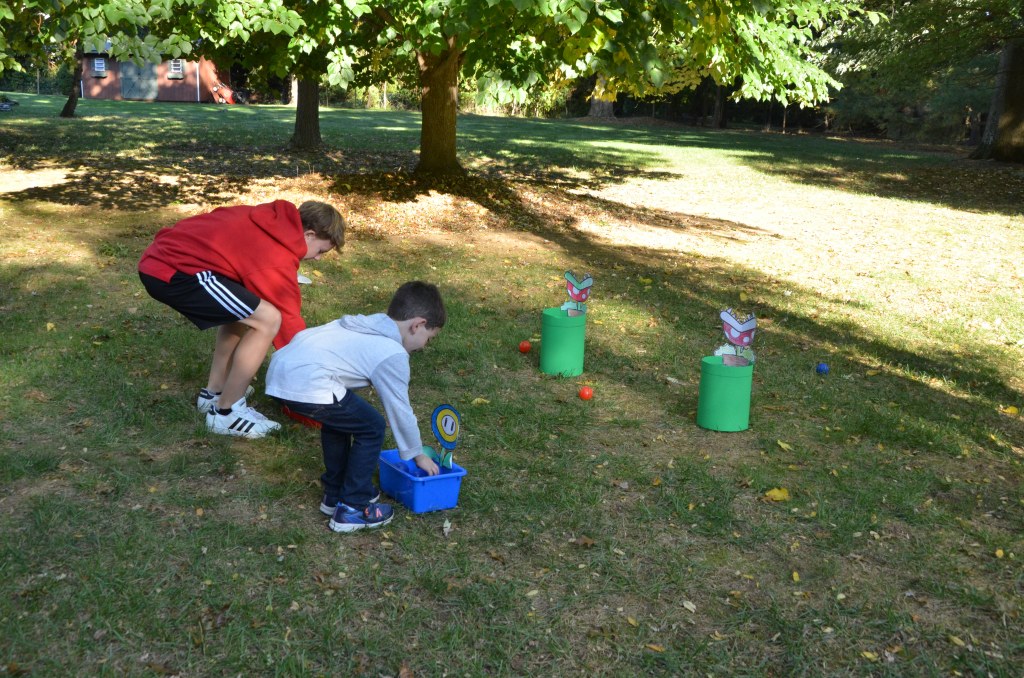
Another easy activity that I usually do some version of for parties … a ball toss! For this party, I used empty pretzel rod barrels and made them into pipes with piranha plants. I made two of them, and then put out buckets with lightweight blue and red balls. One was labeled fire balls and the other was ice balls. Then kids could see how many they could get in the pipe to kill the piranha plant. We no longer have the ball pit, but balls like THESE* come in handy for a lot of activities!
Pipe Pop-Ups

I forgot to get a picture of this Mario craft finished! To make it, I printed out a bunch of coloring sheets with small Mario characters. Kids colored a character, cut it out, and glued or taped it to a popsicle stick. Then they inserted the popsicle stick into the slit I had already cut in the bottom of a green paper cup. When you slide the popsicle stick, it looks like the character is popping in and out of a Mario pipe.
Yoshi Knock-Down
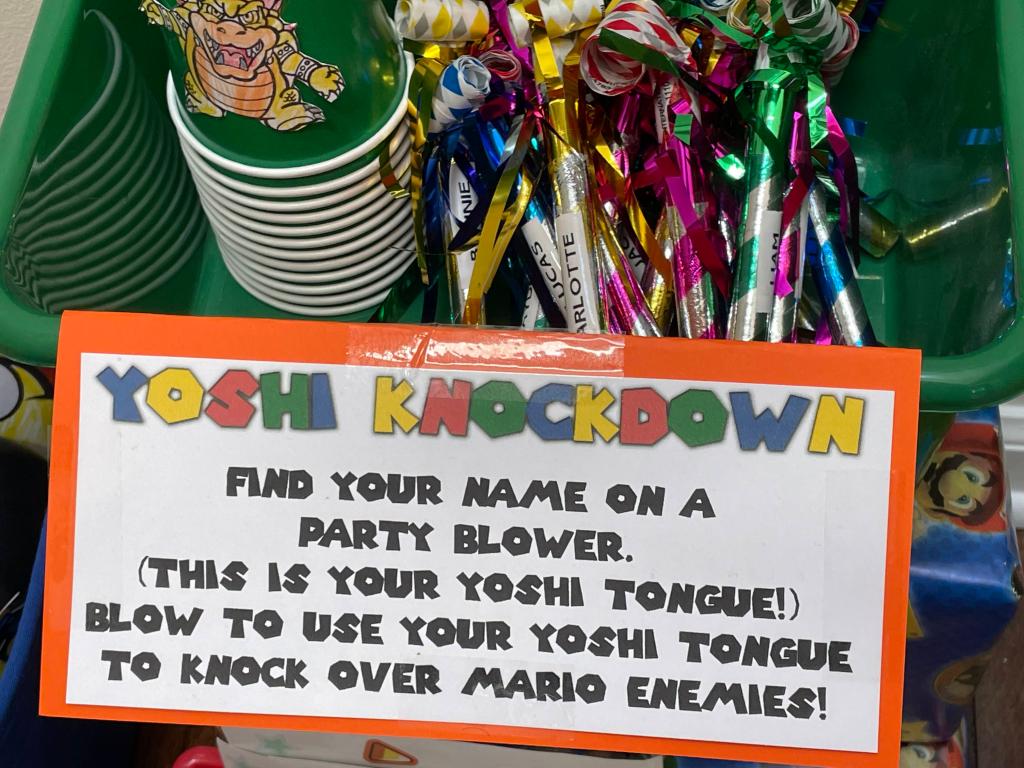
One of the funniest things about Yoshi is his long tongue! For this game, I got a few packs of party blowers from Dollar Tree to act as the kids’ Yoshi tongue. (I actually used my label maker to put labels on them for each kid in case people were worried about sharing.) Before the party, my kids colored Mario villains that we then cut out and taped onto green paper cups. Kids stacked up the cups and then used their Yoshi tongue (party blower) to knock over the bad guys.
Koopa Troopa Bowling
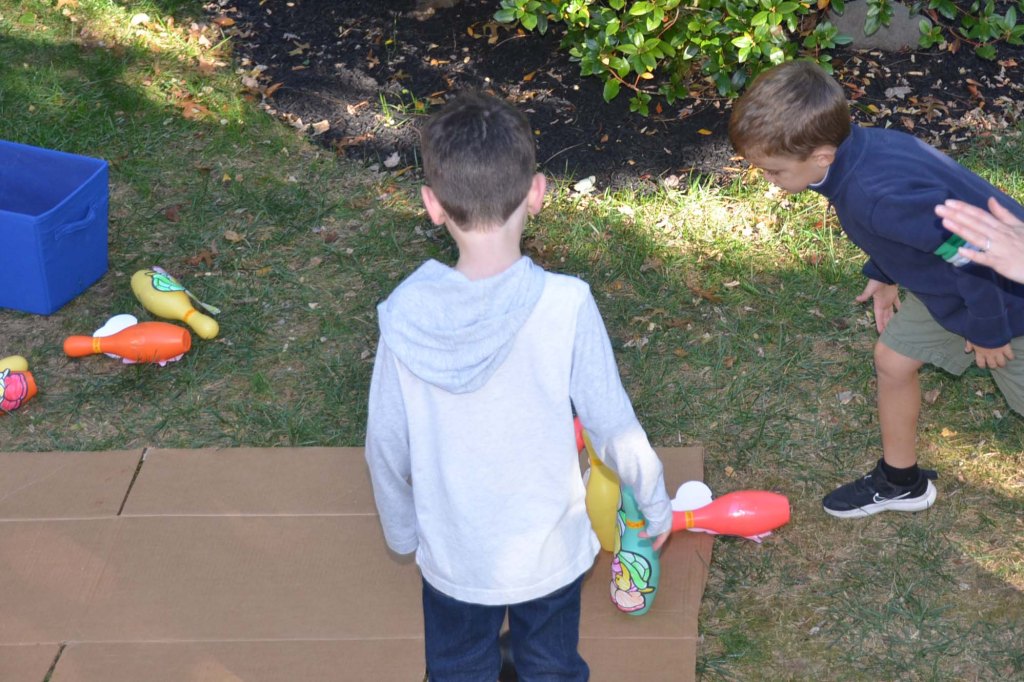
We have one of those bowling kid toys with lightweight pins and balls. I printed out pictures of Koopa Troopas (and one Bowser), which my kids helped color before the party. Then we taped them onto the bowling pins, so kids could roll the bowling ball to knock over the Koopa Troopas.
Tip: This game was hard to do on grass, so I grabbed a big piece of cardboard (just a box broken down) from our stash, and that made it easier.
Goomba Stomp

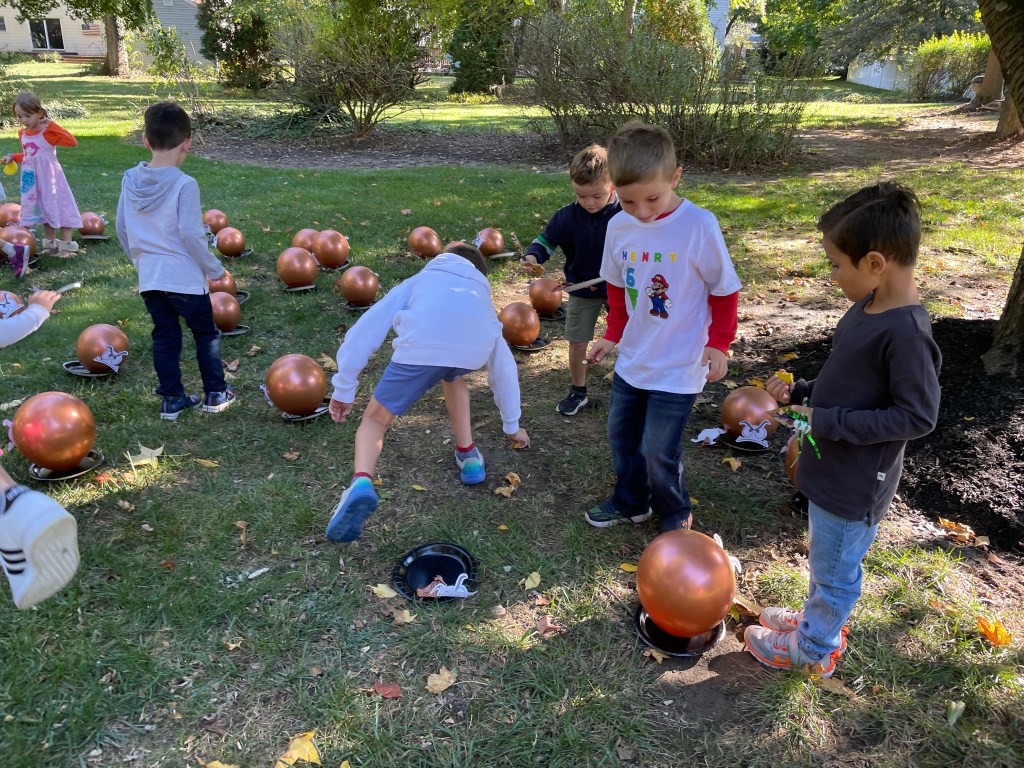
I saw this game on Pinterest (many sources) and knew I wanted to do my own twist on it! The idea is that the kids jump on balloon Goombas to pop them just like Mario jumps on Goombas to kill them in the game. I got brown balloons * and blew them up using my air pump*. (Grandma and Grandpop helped with this part the day before the party!) To add a little extra surprise, we popped in a plastic gold coin before blowing the balloon up. So Before blowing up the balloon, we popped in a gold coin*, so that the kids would get a coin when they defeated the Goomba. We printed out Goomba eyes, cut them out and taped them on. And to make the balloons stand better, I got a pack of black paper plates, cut a small slit in the center (using my favorite box cutter*), and then put the end of the balloon through the slit.
The set up for this game is a little more time consuming than the others, but the hilarity of seeing Henry and his friends all jumping on these balloon Goombas was worth it!
Tip: You could also use gold chocolate coins for this game. And if your party is near St. Patrick’s Day (or you think to plan ahead), you can usually get gold coins at places like Dollar Tree and Party City pretty cheap. On the flip side, if you have extras after the party, save them for leprechaun fun!
Pin the Tail on Mario
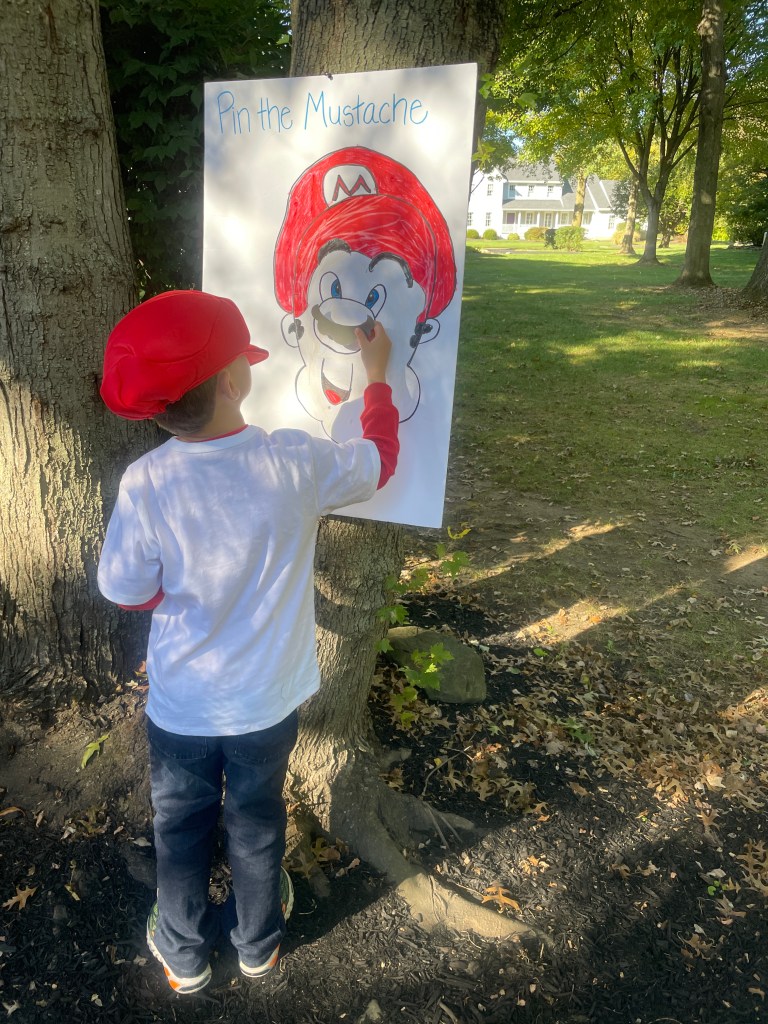
Henry had so much fun helping me make this game. My little artist drew Mario’s face on a big piece of poster board from Dollar Tree. (Being sure to leave off the mustache!) Then we cut mustaches out of black cardstock, and I made them into stickers using my Xyron* (linked to similar to what I’ve had for probably 15 years!) You could also just put rolled pieces of tape on the back. We used Henry’s Mario hat from his Halloween costume to cover the kids’ eyes.
Yoshi Egg Hunt
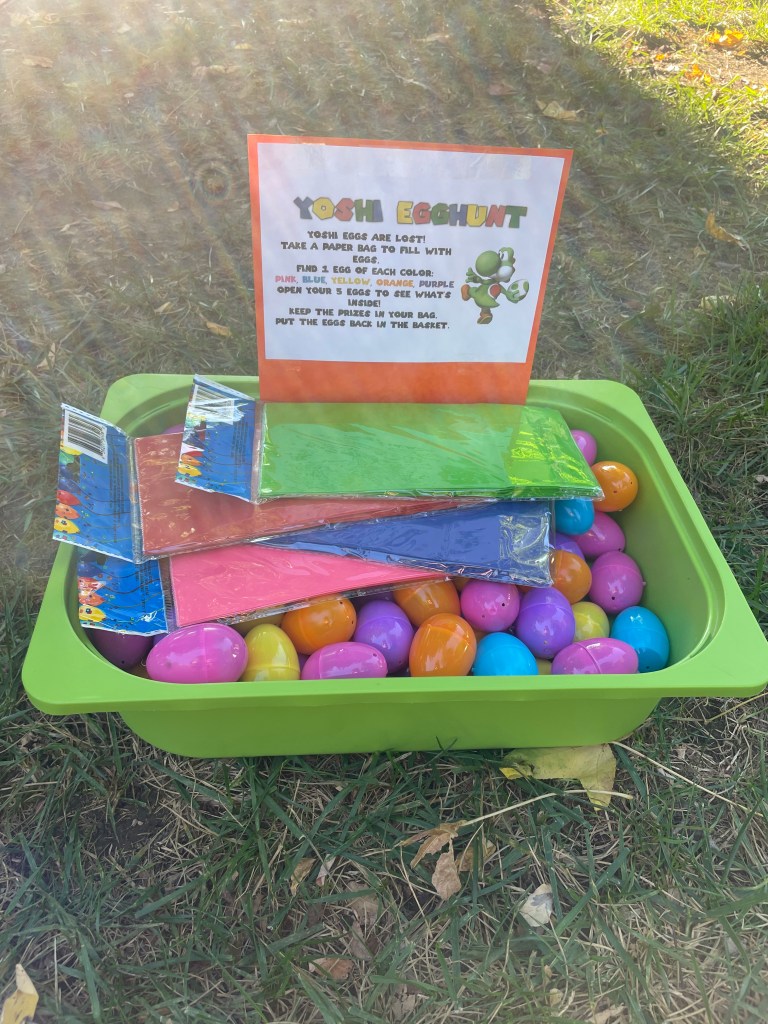
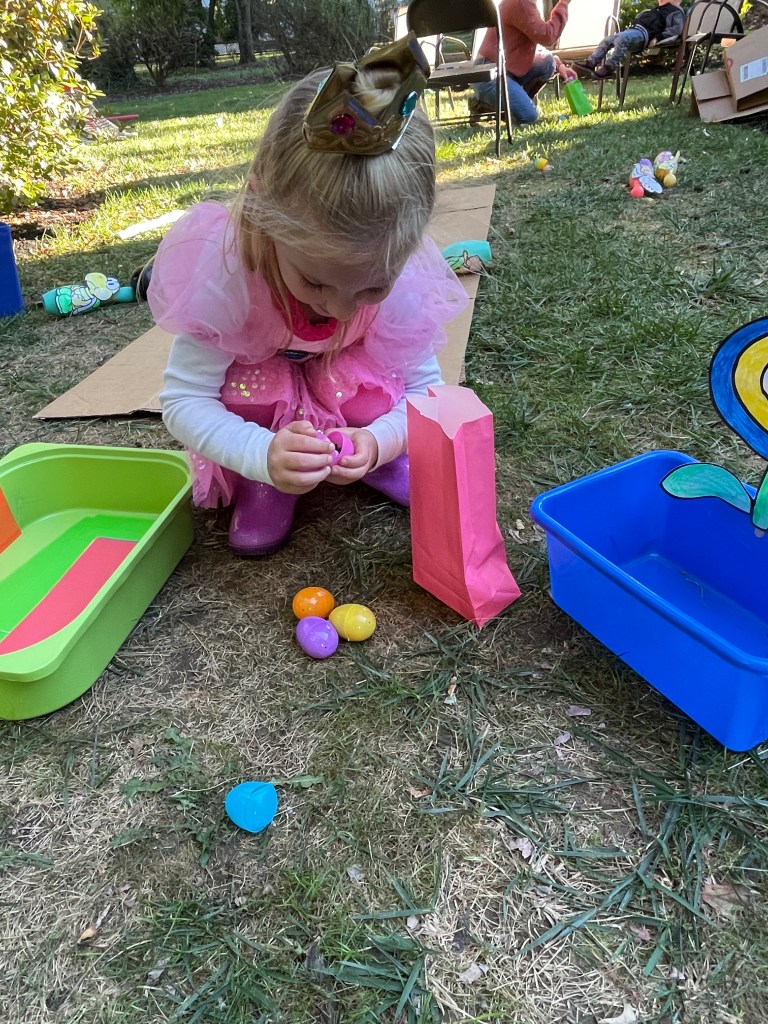
The classic Easter egg hunt … but Mario style! I bought a box of plastic eggs* in a variety of colors. To keep things as fair as possible, I filled each color egg with the same prize. For example, orange eggs had candy, purple had temporary tattoos, yellow had fake mustaches*, etc. (Linking to Amazon for ease, but I think I bought the tattoos and mustaches at Party City.) Obviously, you could save money by just doing all candy that you buy in a big bag, but we have friends with allergies AND these prizes can also serve as a favor. Then I gave each kid a paper bag (bought at Dollar Tree) and asked them to find one egg of each color. They put the prizes in their bag and put the eggs back, so I can reuse those eggs for years to come.
FOOD
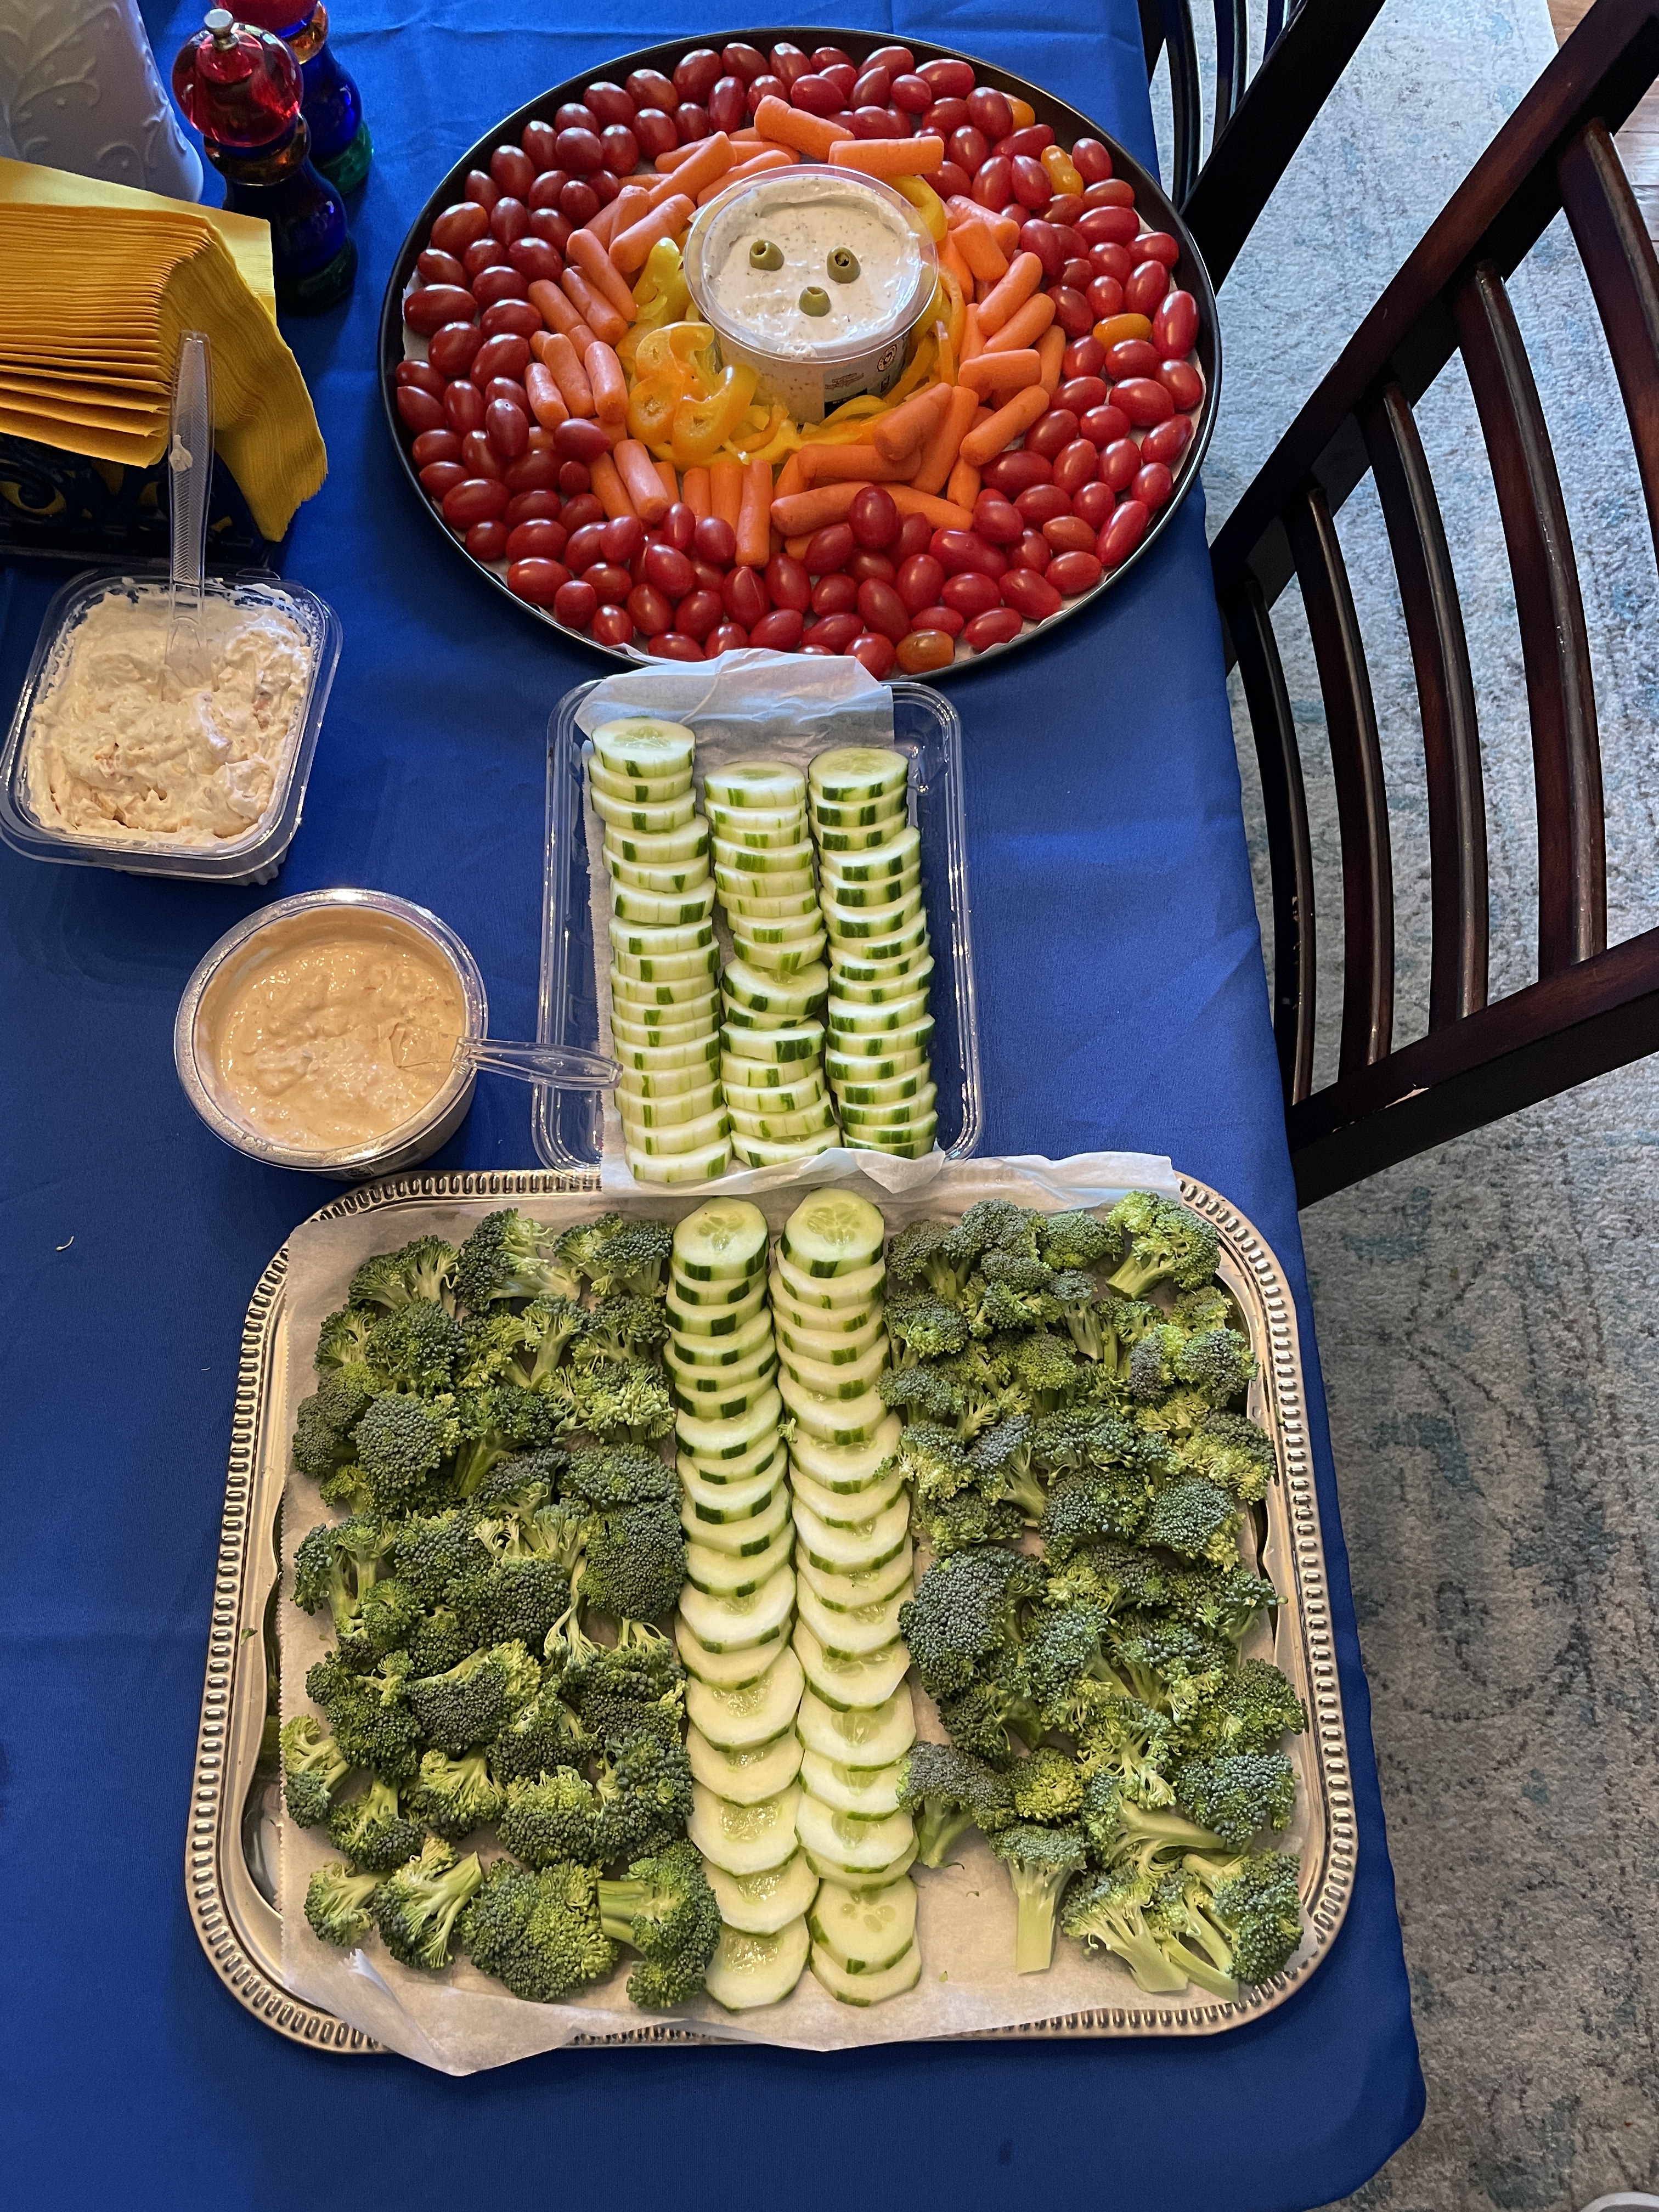
For the main food, we do a mixture of takeout and homemade. We ordered a bunch of pizzas and a tray of chicken fingers & fries from a local spot we love. (Carlucci’s Express if you’re in Lower Bucks County.) My mom made a pot of meatballs that we kept warm in the crockpot, rolls, and we also had a big bowl of pasta that people could have with the meatballs or with butter and cheese. My mother-in-law made an awesome veggie platter in the shape of the Mario fire flower, and we had fruit salad and other snacks out in bowls.
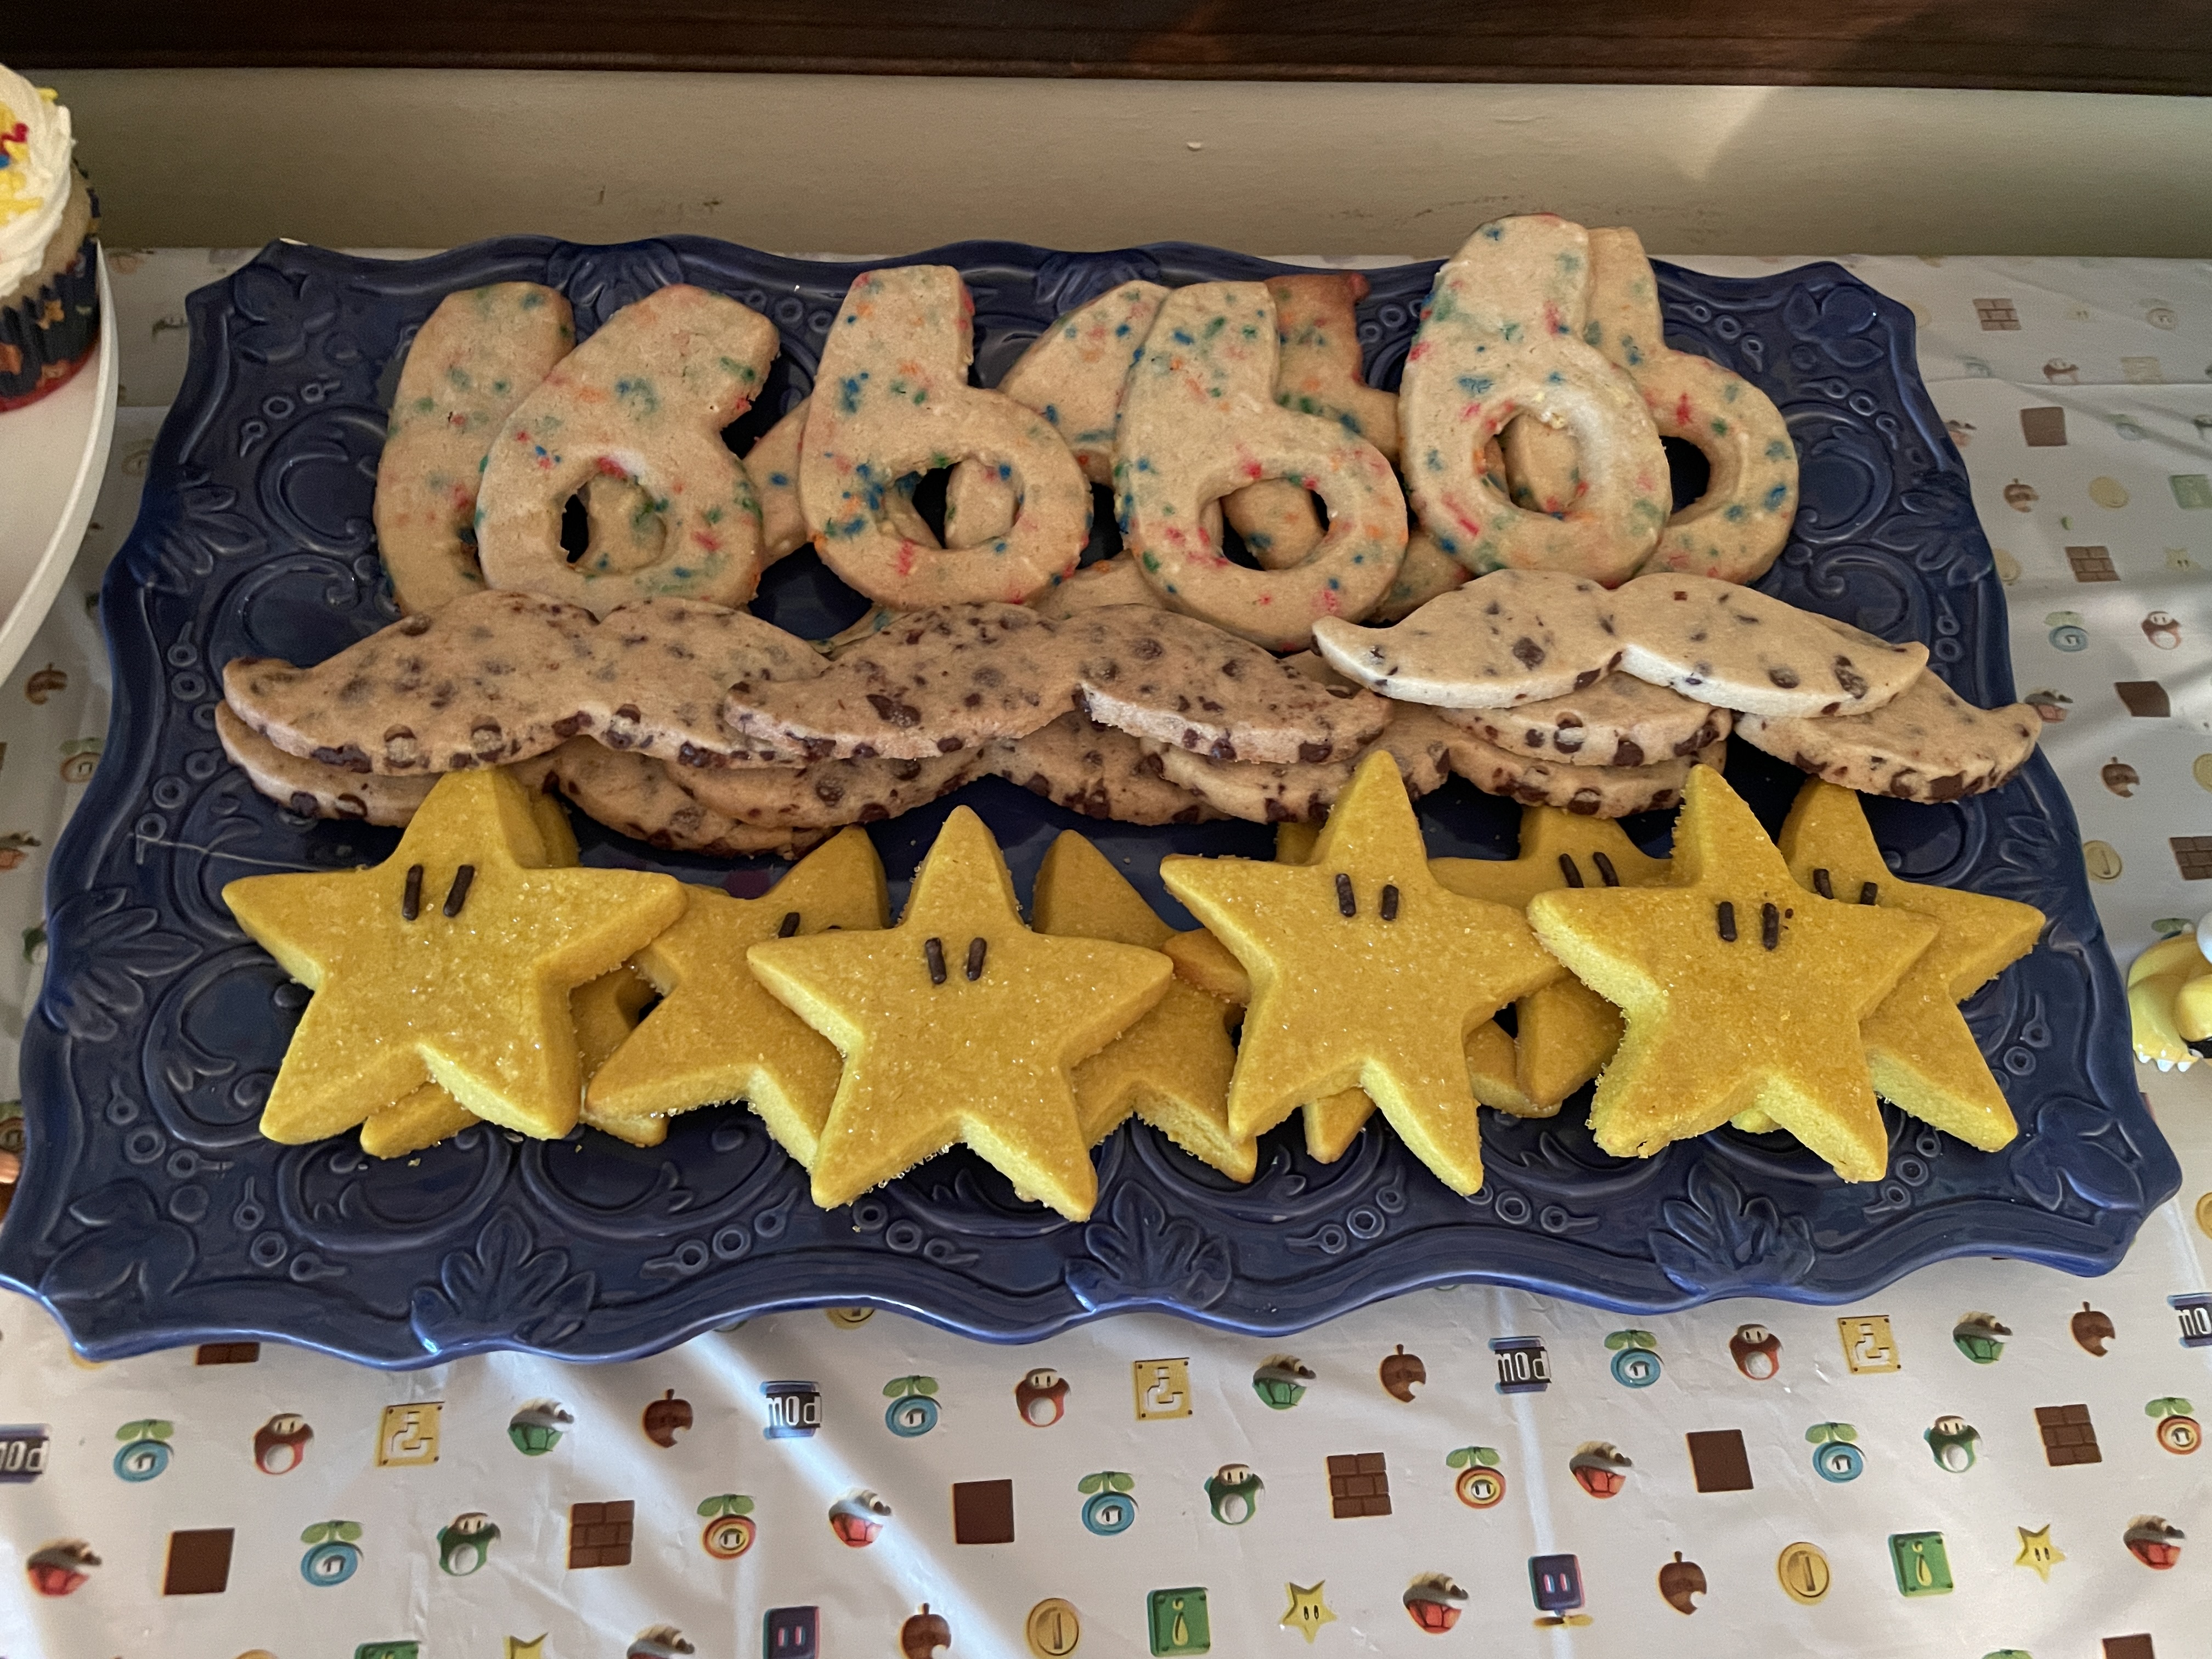

My mom and I love baking, so that’s where we put the most effort. My mom made chocolate dipped pretzels decorated with colored sprinkles inspired by Mario characters (red, blue and yellow for Mario, orange, green and white for Yoshi). And I made 3 batches of my roll-out cookies. I started with the same recipe for each batch, which you can find in THIS post. For one, I added mini chocolate chips and used a mustache cookie cutter*. For the second batch, I added just a bit of almond extract and added rainbow sprinkles to the dough. I used a number six cookie cutter. And finally, I made a batch with the dough plain but with just a bit of yellow food coloring. I then used a star cookie cutter and added yellow sanding sugar and two chocolate sprinkles before baking. Tip: I always check Michael’s and JoAnn’s first for cookie cutters. If they don’t have what I need, then I go on Amazon or Etsy.

To make the cake, I used my favorite method of “doctoring” a cake mix. You can find that in THIS post. But I basically make a few tweaks to the recipe and add mini chocolate chips. My kids love when I pair this with brownie, so that’s become a tradition too. For this year’s cake, I made one round layer of brownie. Then I made the vanilla chocolate chip cake using two of the same round pans. When they were finished, I stacked the brownie and cake, trimming the sides to make them the same size. I frosted the whole thing in homemade vanilla buttercream tinted blue with Wilton gel food coloring*. I added white “clouds” by just making loops of untinted frosting around the top of the cake and scattered some rainbow sprinkles. (Tip: I like to buy the rainbow sprinkles at either Target or Aldi.) I used green icing to make grass and pipes, red icing for piranha plants, and yellow for stars. For the final touches, I placed a few Mario figures on top and around the cake. Henry enjoyed adding these to his collection of Mario toys after the party!
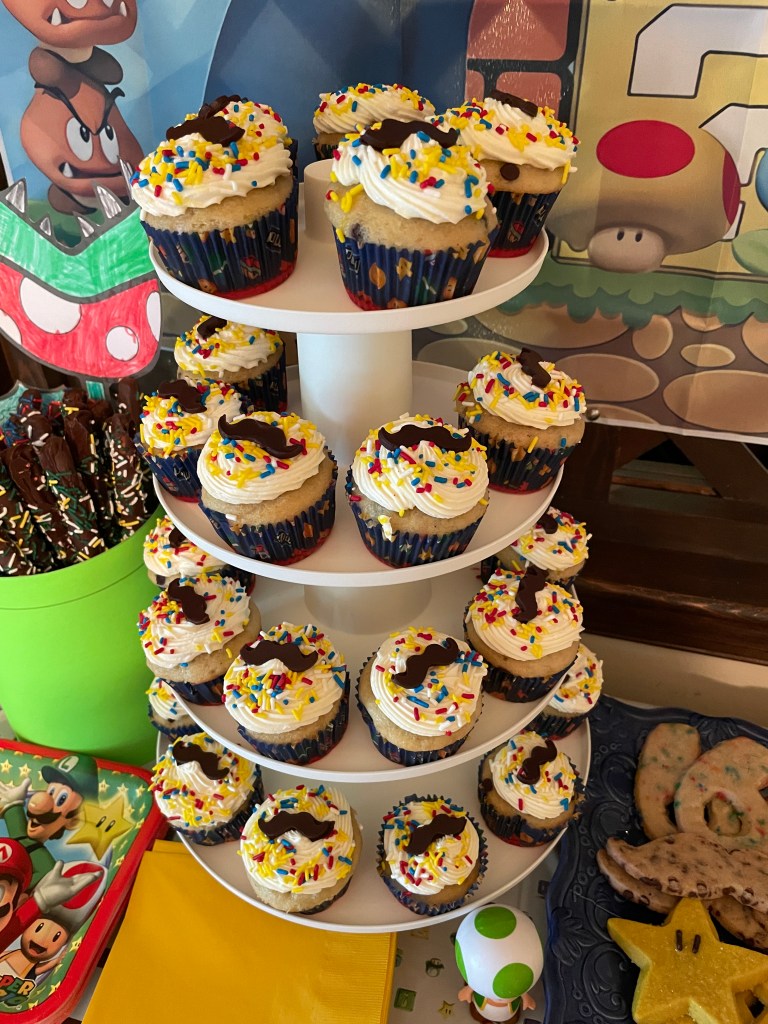
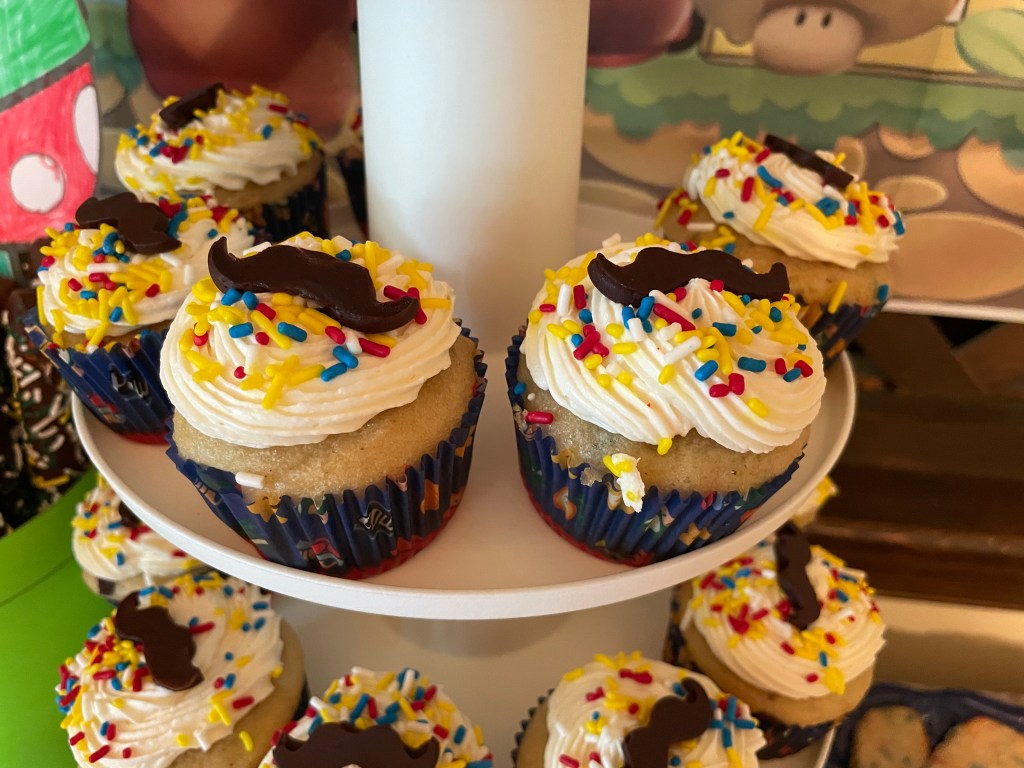
To make the cupcakes, I used the same “doctored” French vanilla chocolate chip batter and made 24 cupcakes using Mario cupcake liners I got at Party City. (Currently unavailable for shipping, so here’s a link to the same from Amazon*.) I topped them with vanilla buttercream, Mario colored sprinkles, and chocolate mustaches I made with THIS mold.
Tip: I love THIS* tiered cupcake/dessert tower and use it for EVERY birthday party.
FAVORS
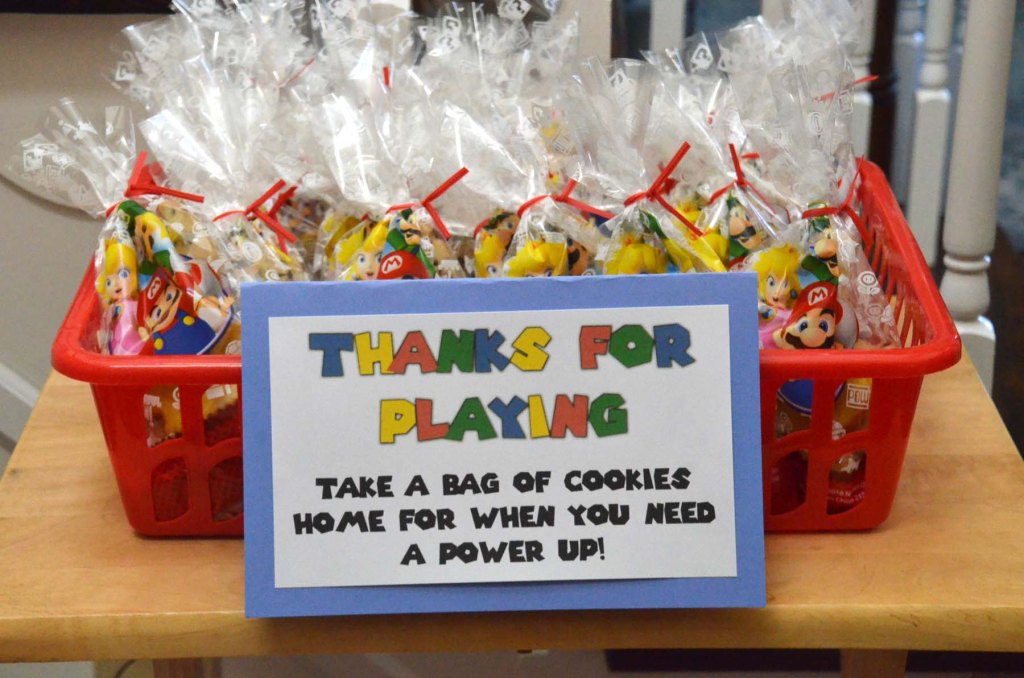
I made those roll-out cookies described above for Henry’s first birthday. At the time, there were a small handful of kids with a big age range, and a lot of adults, so I wanted to have a favor that I thought everyone would enjoy. Since then, we’ve added more kids to our family and friend crew, but the cookies have stuck around. I usually will find cute cellophane bags at Dollar Tree, Party City or Michael’s to bag them up before the party. I got THESE bags at Party City. (They’re more expensive, but available from Amazon too.) I put them out with a handmade sign thanking people for coming.
In addition, kids brought home their decorated pumpkin, crafts, and the prizes they collected from the egg hunt.
GIFT IDEAS
Here are a few links* to just a few of the Mario-themed gifts Henry received for his birthday.
Mario Deluxe Coloring Activity Kit
*As an Amazon Associate, I earn a small amount from qualifying purchases.
Henry had so much fun at his Mario-themed birthday party!
If you have any questions about the party that I missed, feel free to ask! I will also be posting leftover decor to Facebook Marketplace soon, but reach out if you’re interested.

hi! do you have links to the printables you used for the party signs and gomba faces, etc?
LikeLike